Friday, 14 November 2014

Installing ConfigMgr client on Linux Server

Back to ConfigMgr main menu
 
Back to Linux menu 

In the last section we copied the ConfigMgr client installation files to the Linux server. Now we will instal the client. 


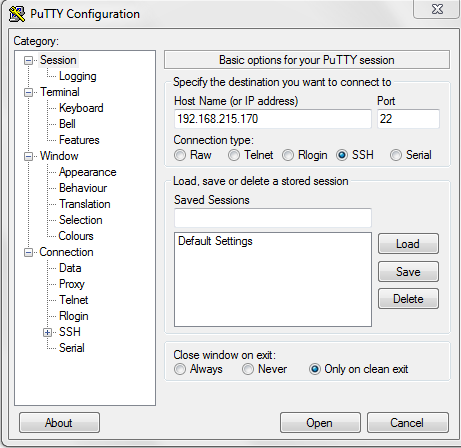
Launch PuTTY and connect to the Linux server.


Execute the following commands

cd /sccmclient
ls -l
 
   (this lists the files and shows the file permissions)

Note that all the file permissions are Read & Write (no execute). We must change this (on the "install" file) to allow execute.

You can use either

chmod 755 install
or

chmod +x install

See that the permissions have changed for the "install" file.

Now install the client. Execute the following command:

./install -mp SCCM_Server.domain.local -sitecode P01 ccm-Universalx64.tar


Client has been installed.


New folders have been created.


View the configuration file by executing the following:

more /opt/microsoft/configmgr/etc/scxcm.conf


View the end of the log file by executing the following:

tail -F /var/opt/microsoft/scxcm.log

(Tip: press ESC & q together to leave the log view and return to command line).


See ConfigMgr service (ccmexecd).

To start the client:

/etc/init.d/ccmexecd start

To stop the client:

/etc/init.d/ccmexecd stop


In the next section we will ensure that the server is Approved in ConfigMgr so that it can receive policy. We will also examine inventory.


Copying ConfigMgr client files to Linux server

Back to ConfigMgr main menu

Back to Linux menu 

The client installation files for non-Windows devices are not provided natively with ConfigMgr 2012 R2. You have to download them independently. Navigate to the link below to download the required files.

Microsoft System Center 2012 R2 Configuration Manager - Clients for Additional Operating Systems


 Click on Download to see the files available


I need the Linux files.


Downloaded Linux files (zipped).


Extract the file to a folder on your hard drive. Note that you receive an error if you try to extract using x86 OS. You need to use x64 OS.


These are the ConfigMgr client installation files for Linux servers.

-----------------------------------------------------------------------------------

Now let me introduce you to two amazing tools.

PuTTY

PuTTY is an open source SSH and Telnet client. I primarily use it for managing Linux servers and Cisco networking devices.

Download PuTTY from http://www.putty.org/


Choose the download for your platform.


Launch the executable (you do not install PuTTY). We'll get back to this tool shortly.

PCSP

PCSP (PuTTY Secure Copy) is part of the PuTTY family and can be downloaded from the same location. It is a command-line secure copy tool. Just copy pscp.exe to a folder on your hard drive.


We'll look at the use of this tool shortly.

----------------------------------------------------------------------------------

Launch PuTTY.


Connect to the Linux Server.


Log in as "root" and enter the password.


Execute this command (note that all Linux commands are case-sensitive): 

mkdir /sccmclient  

You have now created a folder on the Linux server. We will use this for the ConfigMgr client installation files.

Back to the local computer - we will now use PSCP to copy the client files to this folder.

Navigate to the folder where you saved the client files.


Execute the following command:

C:\Yourpath\Pscp.exe  *  root@192.168.215.170:/sccmclient

(Yourpath will be where you saved PuTTY files, use the IP address of your Linux server, sccmclient is the folder with the ConfigMgr client files).

Enter the password and see the files copying.

Now back to our PuTTY session.


Execute the following commands:

cd /sccmclient  (this changes the directory context)
ls   (lists the files in the directory).

See the ConfigMgr 2012 installation files for Linux.

In the next section we will install the client.


Managing Linux clients with ConfigMgr 2012 R2

Back to ConfigMgr main menu

System Center Configuration Manager 2012 SP1 introduced an exciting new feature - the ability to manage UNIX and Linux clients. The list of supported operating systems has grown since that initial release. You can find the full list (and the names of the installation files) in the "Client Requirements for Linux and UNIX Servers" section of this TechNet Library article.

Supported Configurations for Configuration Manager

The following operating systems are supported:

  • Red Hat Enterprise Linux (RHEL) 4,5,6,7
  • Solaris 9,10,11
  • SUSE Linux Enterprise Server (SLES) 9,10,11
  • Centos 5,6,7
  • Debian 5,6,7
  • Ubuntu 10.04 LTS,12.04 LTS,14.04 LTS
  • Oracle Linux 5,6,7
  • HP-UX 11iv2,11iv3

Further information can be found in this TechNet article:


How to install the clients on Linux and UNIX computers

Client Push installation and automatic client push are not supported on non-Windows clients. You have to download the client installation files and manually copy them to the Linux servers. You then execute the installation manually. At that point you can retrieve hardware and software inventory. You can also automatically deploy updates and RPM files to the servers using traditional ConfigMgr packages and programs.

Please browse the following sections for details on Linux management. I have used a Red Hat Linux 6.5 Server (RHEL 6.5) for these labs.


Copying ConfigMgr client files to the Linux server

Installing ConfigMgr client

Linux client - machine policy and hardware inventory

Linux client - software distribution and patching

Issues I've encountered with Linux Management 


Friday, 10 October 2014

ConfigMgr 2012/ SCCM 2012 - add boundary for Direct Access clients

Back to ConfigMgr main menu

Many of us have seen the problem. We have configured our laptops to use Direct Access and we never see them again. The ConfigMgr 2012 client is installed but has never received it's policy or reported correctly.


This is the dreaded ConfigMgr client that has never received policy.


Only two actions.

What is the problem? The problem is that ConfigMgr is not allowed to send a policy to these devices as they do not belong to any of the known boundaries. The good news it that this is easy to fix. We have to configure an IPv6 boundary.

It's easy to get the information we need. Open the properties of one of your Direct Access clients.


See the IPv6 Prefixes.


Create a boundary for each IPv6 prefix.


New boundaries.


Restart the SMS Agent Host on the client to speed things up. Now examine the PolicyAgent.log file.


We see activity.


The policy is now being downloaded to the client.


Success - healthy client

See here for additional tip for finding your IPv6 Prefix.


Friday, 5 September 2014

Upgrade to MBAM 2.5

MBAM 2.5 was released with MDOP 2014 on 13th May 2014. This was an eagerly awaited release as it added functionality which transformed MBAM into a truly enterprise grade encryption product. In particular it now allows administrators to force users to encrypt their drives (I previously blogged about this here).

This blog post describes an upgrade from MBAM 2.0 SP1 to MBAM 2.5 but can be a reference for upgrades from other versions.

Have a look at the official documentation before you start.

Getting started with MBAM 2.5


Deploying MBAM 2.5


Deploying Server Infrastructure


Configuring MBAM 2.5 Server features


Validating MBAM 2.5


Upgrading to MBAM 2.5  from Previous versions

This last TechNet Library document tells us the steps required to upgrade to MBAM 2.5 from each of the earlier versions.


 OK. Let's crack on. I carried out the following steps to upgrade my stand-alone MBAM environment to V2.5.

Step 1.
Identify the previous version.

MBAM Agent 2.0           --> 2.0.5301.1

MBAM Agent 2.0 SP1   --> 2.1.0117.0


 I see that my current version is MBAM 2.0 SP1 by looking in Programs & Features.

Step 2.
Back up the databases.

My attitude towards backups is - "I'd prefer to be looking at it than looking for it".

Please back up the databases before you start.


Step 3.
Uninstall previous MBAM version (don't worry - the databases will remain intact).


Step 4.
Update the MOF files

Even if you have already done this for a previous version you must do this step again. The MOF files for v2.5 are very slightly different (you have to look closely to see this).


Edit CONFIGURATION.MOF file


Edit the SMS_DEF.MOF File


See confirmation of the difference when you import the new SMS_DEF.MOF file.

Step 5.
Install MBAM 2.5


Step 6.
Configure MBAM 2.5

You have some choices to make (similar to previous versions).


Installation and configuration completed. See how it tells us that the databases already exist.

Note that I had a problem with prerequisites - required for v2.5 but not my previous version.


Step 7.
Update Group Policy

Have a look at "Deploying MBAM 2.5 Group Policy Objects"

Download MBAM 2.5 Group Policy templates from here


Extract the admx and adml files and copy them to Sysvol on a Domain Controller.


Add the Group Policy Management feature (if you haven't already done so).


New MBAM 2.5 template


You can now force a user to encrypt

Step 7.
Upgrade clients

You can upgrade clients by creating and deploying a ConfigMgr application.


Step 8.

Test, test, test before rolling out to production.