Showing posts with label On premise MDM. Show all posts

Friday, 1 July 2016

ConfigMgr Current Branch - Manage Windows 10 with Configuration Service Providers (CSPs)

System Center Configuration Manager landing page

I've been pretty quiet on my blog recently. I've been writing chapters for the upcoming ConfigMgr Current Branch Unleashed book and I'm looking forward to it being published towards the end of the year.

So, what's been going on? Deploying and managing Windows 10 has been a lot of fun recently. Microsoft have been promoting the enrollment of Windows 10 devices to be managed as mobile devices. There are several methods of accomplishing this such as:

  • Azure Workplace Join (with Intune automatic enrollment)
  • ConfigMgr On-premise MDM
So, what does it actually mean - managed as mobile devices? Beginning with Windows 8.1, Windows computers can also be enrolled and managed as mobile devices through the Open Mobile Alliance-Device Management (OMA-DM) channel. The OMA-DM standard is designed for managing mobile devices such as mobile phones and tablets. It is a lightweight specification and was designed to manage small foot-print devices, where memory, storage space, and bandwidth could be limited. Devices that use this standard are referred to as modern devices.

OMA-DM uses Open Mobile Alliance–Unified Resource Identifier (OMA-URI) values. Microsoft has led the way in publishing OMA-URI values that can be used to manage their devices using Intune. Useful examples of custom URI settings are available in this Microsoft document:

Custom URI settings for Windows 10 devices

More jargon - what is OMA-URI in English? Before that can become clear I need to introduce another term - Configuration Service Provider (CSP). CSPs expose device configuration settings in Windows 10. They provide an interface to read, set, modify, or delete configuration settings for a given feature and typically map to registry keys, files or permissions. CSPs are specific to a Windows 10 feature eg VPN CSP allows VPN configuration of a device. So, as promised, OMA-URI in English is: 

"The full path to a specific configuration setting is represented by its OMA-URI. The URI is relative to the devices’ root node (MSFT, for example)".

It's clearer when you see an example:


This is a tree format diagram of the RemoteLock configuration service provider. The RemoteLock CSP supports the ability to lock a device that has a PIN set on the device or reset the PIN on a device that may or may not have a PIN set. This CSP is only supported in Windows 10 Mobile.

We can configure this feature using URIs as follows:

./Vendor/MSFT/RemoteLock/Lock
./Vendor/MSFT/RemoteLock/LockAndResetPIN
./Vendor/MSFT/RemoteLock/NewPINValue

It's all pretty straightforward. Lets see a real world example. I want to stop users being able to unenrol their Windows 10 devices. This is very easy to configure using ConfigMgr Current Branch (you can do this with standalone Intune as well). You will need to have added an Intune subscription (even if you are using on-premise MDM). We will use the Policy CSP. There are a lot of settings that you can configure using this CSP. Have a look at this Microsoft document for details. You can see the settings and their supported Windows 10 editions.

Policy CSP

We are interested in this setting: Experience/AllowManualMDMUnenrollment. It's available for both desktop and mobile.

The URI full path is:

./Vendor/MSFT/Policy/Config/Experience/AllowManualMDMUnenrollment

Data type: Integer

Allowed values:
0 – not allowed
1 – allowed (default)


The process is carried out by creating and deploying Configuration Items in the ConfigMgr console.


Navigate to Assets and Compliance > Overview > Compliance Settings > Configuration Items

Right click Configuration Item and choose Create Configuration Item

On the General page, enter a name and description. Select "Windows 8.1 and Windows 10" in the "Settings for devices managed without the Configuration Manager client" section. Click Next.

Select all Windows 10 on the Supported Platforms page. Click Next. 


On the "Device Settings" page, select "Configure additional settings that are not in the default settings groups". Click Next.


Click Add on the Additional Settings page.


Click Create Setting on the Browse Settings page.


Enter the required details on the "Create Setting" page. Click Apply and OK.


Back on the Browse Settings page choose your new setting and click Select.


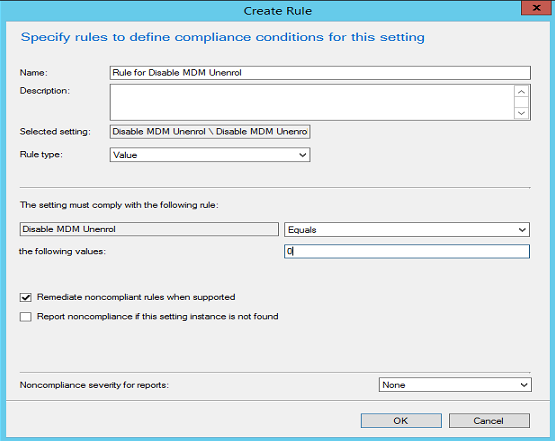
Add the required value on the rules page and select OK.


The rule has now been configured. Finish the wizard to create the Configuration Item and then add to a Configuration Baseline. Finally deploy the Configuration Baseline to your devices.

So what does that look like on the client.


I've tried to remove the MDM management in this managed Windows 10 client but I'm unable to do so.

So, now that you've seen how easy this is try it yourself. Peter van der Woude has some cracking examples of managing Windows 10 features using OMA-DM:

Managing AppLocker on Windows 10 via OMA-DM

Setting up kiosk mode on Windows 10 via OMA-DM

Managing Windows Update for Business on Windows 10 via OMA-DM

Have a look at the full list of Configuration Service Providers. It's a impressive comprehensive list and you'll certainly find something that you can test in your lab.

Configuration service provider reference

I hope this blog was useful in explaining some of the new terminology. Until next time......


Tuesday, 23 February 2016

Configuration Manager (Current Branch) On premise MDM - deploying apps

System Center Configuration Manager landing page

Configuration Manager 1511 introduced us to on premise MDM. Windows 10 devices can now be managed as mobile devices using an on premise infrastructure only (although Microsoft Intune is still required for licensing). This is made possible by using the OMA-DM channel. I've previously blogged about this here. Remember that only Windows 10 devices are supported.

After you enrol Windows 10 computers to the on premise infrastructure  you will be able to deploy apps to the devices. Three app types can be deployed to devices managed in this way:

1. Web Applications (from Windows Store)
2. 32-bit MSI apps
3. Windows app packages - Line of Business (appx)

Let's have a look at the requirements for each of these app deployments. 1 & 2 are really straightforward. 3 is a little more complex. I haven't deployed this in my lab yet but I've listed the high level steps below. It's on my list of "things to do".

1. Web Applications

This couldn't be easier. I chose Dropbox from the Windows Store as an example. Launch the "Create Application" wizard as normal.


Choose the Web Application deployment type. Enter the URL for the store app.


The app must be deployed as "Required". Remember there is no need to distribute this app.


I don't want to wait for the on prem client to refresh policy so I manually "Sync" (Settings > Accounts> Work Access).


Dropbox is installed almost immediately.


A successful installation is reported.

There are two conditions associated with the deployment of this app type:
  • must be deployed as "Required"
  • can only be deployed to Device collections

2. 32-bit MSI apps

This is also very straightforward to implement. It's a similar process to the one we use to deploy MSI apps to full ConfigMgr clients.


Choose "Windows Installer through MDM (*.msi)" as the deployment type> Enter the path to the MSI. I'm testing with the Now Micro Right Click tools.

Remember that you have to distribute the content. Just for kicks I just distributed to a HTTP DP in the first instance.


The client just waited for content before timing out. Then I distributed to my HTTPS DP.


The app installed immediately I refreshed the policy on the device (Sync).


Note that it will take a further sync for the deployment to be reported as successful by ConfigMgr.

Conditions:
  • 32-bit MSI apps only supported
  • Single MSI file only
  • Content must be distributed to a HTTPS distribution point (configured to allow requests from mobile devices).
  • must be deployed as "Required"
  • can only be deployed to Device collections

3. Windows app packages - Line of Business

This type of app is a little trickier to deploy. The process is as follows:

App
  • Create your LOB app (typically appx)
  • Sign the app with the Enterprise Code Signing certificate
  • Distribute the content to a HTTPS distribution point (configured to allow requests from mobile devices)
  • Deploy the app to a device collection (must be "Required")

Device
  • Enable sideloading (computer settings or registry)
  • Install app code signing certificate (manual, certificate profile or  provisioning package)
  • Wait for computer to refresh policy or manually "Sync" (Settings > Accounts> Work Access)
  • App is installed and should appear in the start menu
  • You can also verify using the Get-AppxPackage PowerShell cmdlet

Note that the deployment of appx apps is still a work in progress. The Configuration Manager console might show an error for the application deployment status even if the application is successfully installed on the device.

I hope that this blog post has been helpful. I wanted to give you a sense of what is possible using on premise MDM with Configuration Manager. Big things are expected in this space.

Until next time.....

Friday, 22 January 2016

Configuration Manager - On premise MDM

System Center Configuration Manager landing page

On premise Mobile Device Management is a new feature released in Configuration Manager 1511. It allows you to manage mobile devices without synchronising your user accounts to Azure. Also devices enrol directly with the on premise infrastructure unlike regular MDM which requires each device to enrol with Intune. Although devices do not contact Intune directly you must still have an Intune subscription and licenses to deploy this solution.

Currently the solution only supports Windows 10 devices.

This is quite a complex solution with many moving parts. I've added a second Configuration Manager server to my lab to enable it.

You'll find the official Microsoft documentation here. I've deployed by getting nuggets of information from various other sources. I'll share all that information here. Kent Agerlund and Panu Saukko provide the bulk of the information in a blog post that they published in late 2015 (see the references section at the bottom of this post).

Beware - this is a pretty long blog post.

The following are the high level steps required (remember this was my lab environment so I had to start from scratch):

PKI (on my Domain Controller)

  • Install PKI
  • Configure CRL and CRLDP
  • Create Certificates

ConfigMgr roles (my second CM server)
  • Add Management Point and configure for HTTPS
  • Add Distribution Point and configure for HTTPS
  • Add Enrollment Point and Enrollment Proxy Point
SSL fix
  • Registry fix (SendTrustedIssuerList)
Additional ConfigMgr configuration
  • User collection
  • Add Intune subscription (require Service Connector)
  • Enable Windows enrollment
  • Create Enrollment Profile (Client Settings)
Client (Windows 10 workgroup)
  • Certificates
  • Work access > Connect
     
So let's have a look at some details and tips for these steps.

Install PKI


Installing Certificate Services is outside the scope of this blog post. I installed a default Enterprise Root Certificate Authority in my lab by adding Active Directory Certificate Services to my DC.


You will need the following role services:
  • Certification Authority
  • Certification Authority Web Enrollment
  • Certification Authority Web Service
Note that the Certification Authority and the Certification Authority Web Service cannot be installed simultaneously. You must complete the CA setup first and then add the CA Web Service.


Use this TechNet library document for further information:


Configure CRL and CDP

When Windows 10 clients communicate over HTTPS they automatically check to see if the certificate they are using has been revoked. They find this information in the CRL (Certificate Revocation List). The CRL comes in the form of two files stored in a virtual directory which is accessible to the Windows 10 clients (full and delta CRL files).

The CRL location (CRL Distribution Point) must be configured in the CA so that it is included in all issued certificates. If you don't get this bit right you will not be able to successfully implement on premise MDM. You have to do this configuration BEFORE you issue your certificates.

(I haven't personally tested this but it looks like, if you are already configured to use https, you will have to replace the MP and DP certificates after you carry out this work).

Follow this Microsoft blog to configure your CRLDP.

Creating a Certificate Revocation List Distribution Point for Your Internal Certification Authority

The steps are as follows:


Create CRL DNS record


Add CDP extension on CA


Create file share and virtual directory


Publish CRL to CDP

Create Certificates

As I previously said there are numerous working parts to this solution. We will require an additional Management Point and Distribution Point (configured to communicate via HTTS). Therefore we need a few certificates. The process for this is the same as we use for implementing Internet Based Client Management. I used the following certificates for my lab:
  • Distribution Point Client Certificate
  • Management Point Web certificate
  • Client certificate
There are several places to get good information on how to create the certificate templates and generate the certificates required for Configuration Manager.

PKI Certificate Requirements for Configuration Manager

SCCM 2012 Internet based client management

How to install a ConfigMgr Client on a WORKGROUP computer, when the ConfigMgr Site is in Native Mode.

The main steps are as follows:
  • Create web certificate template
  • Create DP certificate template
  • Create client certificate template
  • Generate web certificate
  • Generate DP certificate
  • Generate client certificate
  • Assign the web certificate in IIS and bind to https (second Configuration Manager server)

Add Management and Distribution Points and configure for HTTPS

I added an additional Configuration Manager Management Point and Distribution Point to my second server. (don't forget to make the Configuration Manager Site Server computer account a local administrator on this server).


See MP Prerequisites


See DP Prerequisites

See my previous blog posts for installing additional Management and Distribution Points

Management Point

Distribution Point

This time we need to configure for https


Select "Specify an FQDN for this site system for use on the Internet. If we were configuring this for IBCM we would use an external FQDN here. However this is for on premise only so just enter the name of the server.


Select HTTPS (Allow intranet and internet connections). Select "Allow mobile devices to connect to the DP".
Import the DP certificate we created earlier.


Choose HTTPS (allow intranet and internet connections) for the MP.


After the roles have been added edit the site properties and set the Trusted Root CA.

Add Enrollment Point and Enrollment Proxy Point


Now select to add new site system roles on the second server.


Add the Enrollment Point and Enrollment Proxy Point roles in a default configuration.

(don't forget to install the prerequisites first - you can find them here)

Registry fix (SendTrustedIssuerList)

There is a known issue when using SSL certificate authentication with Windows Server 2012. You can read about this issue here.


Apply the registry fix shown if required.


User collection


You must select a user collection when you create the Intune subscription. For MDM using Intune I always create an "Intune users" collection. The users in this collection will be allowed to enrol devices with Intune. If you are just configuring on premise MDM only, you must choose a user collection, but it doesn't matter which one you pick. This has no effect. A count of licensing is tracked in Intune (rather than specific users).


Add Intune subscription (require Service Connector)


Although this is an on premise solution you will still need to add the Intune subscription.

Enable Windows enrolment


Create Enrollment Profile (Client Settings)

Export the trusted root certificate to a .cer file.

Now navigate to Assets and Compliance > Compliance \settings > Company Resource Access.


Right click and create a certificate profile.


Enter a suitable name and choose "Trusted CA certificate".


Browse to the .cer file. Ensure that the Destination store is Root.


Choose Windows 10.


Finish the wizard to create the certificate profile.


Now enable enrolment in your client settings. Click to "Set Profile".


Click to create an Enrolment profile.


Enter a suitable name, choose the site code and verify the certificate profile.


Click OK to finish and create the enrolment profile.

Client

OK, now let's move to the client.

Import the certificates we created earlier (Trusted root cert and client cert)


Now navigate to Settings > Accounts > Work access  and select "Connect to work or school"


Enter your local account details.


The first attempt will fail. Now enter your enrollment server name.


This looks hopeful. Enter the password.


Choose whether or not you want this password remembered.


We're connecting........


.....and we've connected.


The device is now enrolled using our on premise infrastructure only.

Click on Info to see the sync status


Windows 10 computers now appear in the ConfigMgr console as mobile devices.


Devices can be managed. See hardware inventory. 


We can right click and retire the devices from the console.


The device becomes unmanaged almost immediately.

Issues encountered

1. You must ensure that you have published the CRL in the CRLDP before issuing the client certificates. Otherwise you will have to re-create the certificate.


This is a healthy certificate showing the CRL DP location (see the URL at the bottom).
If you don't do this you will be able to enrol but the device will never sync or appear in the Configuration Manager console.

You will receive an error 0x800728f in this case.

I did carry out the work in advance but I still had the issue. I tested by browsing to the CRL DP location but I couldn't download the CRL files. I could however browse to the virtual directory. I noticed that somehow there was a space at the beginning of the CRL filenames. Once I removed the space I was able to sync correctly.

2. Trusted Root certificate


You will receive this error if you have installed the client certificate but not the Trusted Root certificate on the Windows 10 device.


Now see how to create Windows 10 Provisioning Packages with Configuration Manager.


References:


Install and Configure on-prem mobile device management (MDM) with ConfigMgr vNext TP3 (Kent Agerlund & Pan Saukko)

Creating a Certificate Revocation List Distribution Point for Your Internal Certification Authority

PKI Certificate Requirements for Configuration Manager

SCCM 2012 Internet based client management (System Centre Dudes)

How to install a ConfigMgr Client on a WORKGROUP computer, when the ConfigMgr Site is in Native Mode. (Peter van der Woude)