Monday 23 March 2020

Creating a Windows Virtual Desktop host pool and MFA

For now you can't. It's not supported to use an MFA enabled account when creating a WVD host pool. That's a little tricky. Most production accounts should at this stage be MFA enabled. So what do we do? It's easy, we can use an Azure AD service principal.

What is that about? 

It's not a user account. Rather, an Azure service principal is a security identity used by user-created apps, services, and automation tools to access specific Azure resources.

So how do we use it?

These are the steps we will follow:
  • Create a service principal in Azure Active Directory.
  • Create a role assignment in Windows Virtual Desktop.
  • Sign in to Windows Virtual Desktop by using the service principal.
  • Create the WVD host pool.
The first steps involve using PowerShell.
  • First install the Azure AD and WVD PoSH modules.
Install-Module AzureAD

Install-Module -Name Microsoft.RDInfra.RDPowerShell

Import-Module -Name Microsoft.RDInfra.RDPowerShell
  • Next create the service principal in Azure AD.
Import-Module AzureAD
$aadContext = Connect-AzureAD
$svcPrincipal = New-AzureADApplication -AvailableToOtherTenants $true -DisplayName "Windows Virtual Desktop Svc Principal"
$svcPrincipalCreds = New-AzureADApplicationPasswordCredential -ObjectId $svcPrincipal.ObjectId

  • Now that you've created the service principal you'll need some details before you can continue.
Check the service principal password (you need to do this now as you won't be able to retrieve it once you close this PoSH session).

$svcPrincipalCreds.Value (this will be Result 1)

Tenant ID:

$aadContext.TenantId.Guid (Result 2)

Application ID:

$svcPrincipal.AppId (Result 3)
  • Now create a role assignment for the service principal in Azure AD
First get your tenant name

Add-RdsAccount -DeploymentUrl "https://rdbroker.wvd.microsoft.com"
Get-RdsTenant

Add the role assignment

$myTenantName = "<Windows Virtual Desktop Tenant Name>"
New-RdsRoleAssignment -RoleDefinitionName "RDS Owner" -ApplicationId $svcPrincipal.AppId -TenantName $myTenantName

Test the service principal by signing into Azure AD

$creds = New-Object System.Management.Automation.PSCredential($svcPrincipal.AppId, (ConvertTo-SecureString $svcPrincipalCreds.Value -AsPlainText -Force))
Add-RdsAccount -DeploymentUrl "https://rdbroker.wvd.microsoft.com" -Credential $creds -ServicePrincipal -AadTenantId $aadContext.TenantId.Guid
  • Finally we can use the service principal to create the WVD host pool
On the Windows Virtual Desktop information page, choose Service principal as the Windows Virtual Desktop RDS owner.


Enter the results from the previous PoSH cmdlets and continue to create the WVD host pool.

I hope this helps. Until next time....

Wednesday 18 March 2020

fslogix issue - the media is write protected

This was a tricky little issue to solve. I've implemented a Windows Virtual Desktop POC for a customer and this included configuring fslogix for profile management. The initial registry settings were pretty straightforward:

HKLM\Software\fslogix.
Created a Profiles key with the following values:

Name: Enabled, Type: DWORD, Value: 1
Name: VHDLocations, Type: Multi-String Value, Value: \\remoteshare\Profiles

However my test accounts were being logged on with temporary profiles. Luckily fslogix has good logging. I configured verbose logging (HKLM\SOFTWARE\FSLogix\Logging\LoggingLevel=0)

The log file can be located %ProgramData%\FSLogix\Logs\Profile\Profile-xxxx.log

[00:29:42.963][tid:00000d60.00002248][INFO]             VHD attached
[00:29:42.963][tid:00000d60.00000d64][INFO]             Volume attach event
[00:29:43.056][tid:00000d60.00002248][INFO]             Volume name: \\?\Volume{c58d9a99-2a23-420d-ab67-b45e416cfaae}\
[00:29:43.056][tid:00000d60.00002248][INFO]             Configuration setting not found: SOFTWARE\FSLogix\Profiles\CleanOutNotifications.  Using default: 1
[00:29:43.056][tid:00000d60.00002248][INFO]             Prep1
[00:29:43.056][tid:00000d60.00002248][INFO]             Status set to 100: Waiting for the Windows Profile Service to determine the user's profile folder
[00:29:43.056][tid:00000d60.00002248][INFO]             Profile refcount incremented to: 1
[00:29:43.056][tid:00000d60.00002248][INFO]             Configuration setting not found: SOFTWARE\FSLogix\Profiles\CleanOutNotifications.  Using default: 1
[00:29:43.056][tid:00000d60.00002248][INFO]             Prep1
[00:29:43.074][tid:00000d60.00002248][INFO]             Configuration setting not found: SOFTWARE\FSLogix\Profiles\RegisterAppNotifications.  Using default: 1
[00:29:43.074][tid:00000d60.00002248][INFO]             Prep2
[00:29:43.074][tid:00000d60.00002248][INFO]             Prep2 \AppData\Local\Microsoft\Windows\UsrClass.dat was not found.
[00:29:43.074][tid:00000d60.00002248][INFO]             OneDriveTemp setup
[00:29:43.074][tid:00000d60.00002248][INFO]             C:\OneDriveTemp\S-1-5-21-1xxxxxxxx--> \\?\Volume{c58d9a99-2a23-420d-ab67-b45e416cfaae}\ODTemp
[00:29:43.074][tid:00000d60.00002248][INFO]             OneDriveTemp setup successful
[00:29:43.074][tid:00000d60.00002248][INFO]             Configuration setting not found: SOFTWARE\FSLogix\Profiles\CleanOutNotifications.  Using default: 1
[00:29:43.074][tid:00000d60.00002248][INFO]             Prep1
[00:29:43.074][tid:00000d60.00002248][INFO]             Configuration setting not found: SOFTWARE\FSLogix\Profiles\PreventLoginWithFailure.  Using default: 0
[00:29:43.074][tid:00000d60.00002248][INFO]             vhd(x) \\remoteshare\Profiles\S-1-5-21-1xxxxx_ghampson\Profile_ghampson.vhd has 29932.54 MB left (99.78 % free)
[00:29:43.074][tid:00000d60.00002248][INFO]             LoadProfile successful.  User: ghampson. SID: S-1-5-21xxxxxx
[00:29:43.074][tid:00000d60.00002248][INFO]             loadProfile time: 12797 milliseconds
[00:29:43.074][tid:00000d60.00002248][INFO]           ===== End Session:  LoadProfile: ghampson
[00:29:43.074][tid:00000d60.00002248][INFO]           ===== End Session: Logon
[00:29:43.135][tid:00000d60.00001508][INFO]           ===== Begin Session: Profile Directory Changed: S-1-5-21-108xxxxxxx
[00:29:43.135][tid:00000d60.00001508][INFO]            New Profile Directory: C:\Users\ghampson
[00:29:43.135][tid:00000d60.00001508][INFO]            Configuration setting not found: SOFTWARE\FSLogix\Profiles\ProfileDirSDDL.  Using default:
[00:29:43.135][tid:00000d60.00001508][ERROR:00000013]  CreateDirectory failure: \\?\Volume{c58d9a99-2a23-420d-ab67-b45e416cfaae}\Profile (The media is write protected.)
[00:29:43.135][tid:00000d60.00001508][ERROR:00000013]  Creating VHD Profile directory: \\?\Volume{c58d9a99-2a23-420d-ab67-b45e416cfaae}\Profile (The media is write protected.)
[00:29:43.135][tid:00000d60.00001508][INFO]            Added redirection C:\Users\ghampson -> \\?\Volume{c58d9a99-2a23-420d-ab67-b45e416cfaae}\Profile
[00:29:43.135][tid:00000d60.00001508][INFO]            Configuration setting not found: SOFTWARE\FSLogix\Profiles\KeepLocalDir.  Using default: 0
[00:29:43.135][tid:00000d60.00001508][INFO]            Local temp directory: C:\Users\local_ghampson
[00:29:43.135][tid:00000d60.00001508][INFO]            Successfully handled: S-1-5-21-1xxxxxxxx
[00:29:43.135][tid:00000d60.00001508][INFO]           ===== End Session: Profile Directory Changed: S-1-5-21-1xxxxxxx
[00:29:43.197][tid:00000d60.00001bb4][INFO]           ===== Begin Session: Profile Directory Changed: S-1-5-21-10xxxxxxxx
[00:29:43.197][tid:00000d60.00001bb4][INFO]            New Profile Directory: C:\Users\TEMP

[00:29:43.213][tid:00000d60.00001bb4][INFO]           ===== End Session: Profile Directory Changed: S-1-5-21-10xxxxxxx


So it looked like the flow was as follows:
  •  the VHD was created successfully on the remote share (verified)
  •  the VHD was mounted successfully
  •  fslogix could not copy files to the mounted VHD
  •  fslogix profile could not be loaded
  •  temporary local profile was created
This was the key line from the log file

CreateDirectory failure: \\?\Volume{c58d9a99-2a23-420d-ab67-b45e416cfaae}\Profile (The media is write protected.)

The mounted VHD file was write-protected, but why? I've implemented this solution previously and didn't have this problem. Group policy is always a good place to start and sure enough I found the problem there.


GPO: Deny write access to fixed drives not protected by BitLocker

This GPO setting was enabled. The result was that all fixed drives that are not BitLocker-protected would be mounted as read-only.

I filtered the GPO targeting so that the GPO was not applied to the WVD desktops and all was good. I hope this helps you if you run into the same issue.

Until next time....


Wednesday 11 March 2020

Some tips for setting up a CMG


A ConfigMgr admin has to be a good all-rounder and be knowledgeable in a wide variety of technologies. This came to mind when I was compiling this list of tips for setting up a Cloud Management Gateway. The list includes tips on DNS, certificates and Azure permissions. If you have any tips please add to the list by adding a comment here (or DM me on Twitter). I'll add your tip and your Twitter handle. 

So let's start. The tips are in the form of questions. 

What CName record do I need? 

When we create a ConfigMgr CMG we will actually be creating a custom cloud service in Azure. This needs to be unique so we need to see if we can find an available name before we continue. 

In the Microsoft Azure portal select Create a Resource, > type Cloud Service  > Create. In the DNS name field type the desired domain name – I want to use “GerryHampson”. Note that the full service name would be GerryHampson.cloudapp.net


Don’t continue to create the service. We just want to make sure that the name is available. I always use a public SSL certificate for the CMG service and I know I won’t be able to get a certificate with GerryHampson.CLOUDAPP.NET as the Subject Name. Therefore, we have to be clever. We create a canonical name record (CNAME) in our DNS records to create an alias for the cloud management gateway service to a friendly name.


We’ll use an externally routable domain that I own. See where I’ve created the CName record. Now I can use GerryHampson.EMSLAB.IE as the Subject Name for my SSL certificate for the CMG service. This will direct requests to GerryHampson.CLOUDAPP.NET

Can I use a Wildcard cert? 
Yes you can but don't get alarmed when you select the certificate in the Cloud Management Gateway wizard.

You'll see this warning telling you that the certificate has a wildcard DNS name and you must change it to a proper FQDN. You must delete the wildcard asterisk and type the FQDN e.g. GerryHampson.EMSLAB.IE. 

This automatically changes the value below to (for example) GerryHampson.CLOUDAPP.NET


What file format do I need for the CMG certificate?

When creating a CMG we will need an SSL certificate for authentication. I always us a public SSL certificate for this. We need this certificate to have a .pfx extension and be associated with a private key. No other file extension will do.

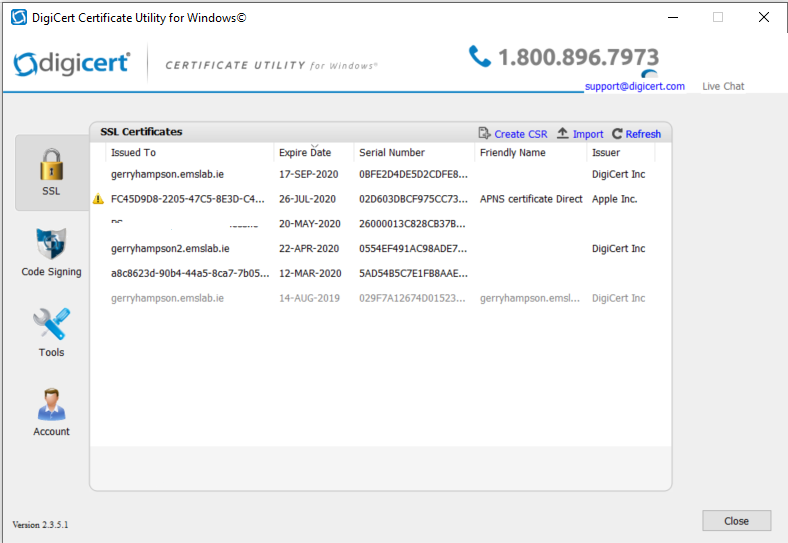
This is usually pretty easy and I normally use DigiCert for my SSL certificates. They provide a utility which you can download here
  • Run Digicert tool and navigate to the SSL section
  • Select Create CSR  
  • Enter Common Name, Organization, City and Country
  • Click to Generate a Certificate Signing Request (CSR)
  • The CSR is generated. You can copy the CSR or save to a file which you can upload on the DigiCert portal when you are processing your order.
  • You'll have to confirm contact details, then you get an email confirming that your certificate has been issued and is ready for download. 
  • Download the certificate (which comes in a .crt file format)
  • Import the certificate to the tool to finish the process which automatically adds the private key. Note that you have to finish the process on the same computer as you generated the CSR. Otherwise you won't have access to the private key.
  • Then export to the .PFX format. Highlight the certificate and select Export Certificate


  • Choose to export the private key.
  • Enter a password for the certificate and the PFX file is generated.
  • Browse to the PFX file in the CMG wizard.
That was easy. However what if you haven't got control over the whole process. I've been in situations where the customer has already generated the SSL certificate. 


These are the files I am often given. Note that there is no PFX file. We can work with this though. You'll need the .crt and .key files.

In this case you can use Open SSL for Windows. Download from here. This allows us to convert SSL certificates to different formats.

Run the tool using this command.

pkcs12 -export -out <Path>\MyCert.pfx -inkey <Path>\MyCert.key -in <Path>\MyCert.crt

The tool accepts the .crt and .key files as input parameters and outputs a .pfx file. It asks you for a password before it generates the file.


What Azure permissions do I need?

There are two distinct permissions that we need to worry about.
  1. The account that you use to configure the Azure services must be a Global Administrator on the tenant. This is to allow you to create app registrations for the server and client app.
  2. The Microsoft documentation tells us that the account that you use to create the CMG must be a subscription administrator. However this role doesn't actually exist. The account must be an Owner of the subscription (Contributor is not enough).

This is what you see if the account is not an owner of the subscription.

What is Enhanced HTTP?

In previous CMG deployments we had to deploy a full PKI infrastructure as the Management Point had to be configured for HTTPS before we could allow CMG traffic.


See that we can only allow CMG traffic if we select HTTPS. Although this is still the preferred way to secure the solution many customers were unhappy with this overhead.


We can select to Use Configuration Manager generated certificates for HTTP site systems. Now Azure AD-joined devices can communicate with a management point configured for HTTP. The site server generates a certificate for the management point allowing it to communicate via a secure channel.


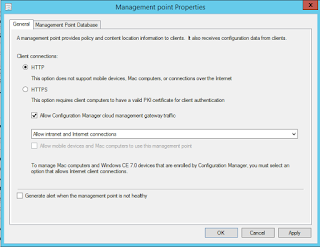
Now we can allow CMG traffic without configuring the Management Point for HTTPS.

How can we test that the CMG is working?

On the server side use the CMG Connection Analyzer


You should see that all components are configured and working together successfully.

On the client side you should first ensure that the client knows about the CMG. Execute this PowerShell cmdlet:

gwmi -namespace root\ccm\locationservices -class SMS_ActiveMPCandidate


It will display all available management points that the client is aware of. The CMG should listed. 

  • Move the client from the intranet to the internet
  • Check ClientLocation.log to see that the client is domain-joined but on the internet
  • In the ConfigMgr console open the All Desktops and Servers device collection
  • Add the field Device Online from Internet and look for True
  • Add the field Device Online Management Point and look for the CMG MP
  • You should now be able to manage this device through the ConfigMgr fast notification channel even though it’s over the internet.
  • In the ConfigMgr console right click the client > Client Notification > Collect hardware inventory
  • On the client the InventoryAgent.log file shows that inventory is being collected. You should also be able to see this in the datalder.log file in ConfigMgr

Does the date and time matter?

Oh yes it does. We have deployed several CMGs for customers at this stage and we’ve generally not had any issues. However we had one difficult environment. The Primary Site server sat behind two firewalls and a web filter so we had to work closely with the network team to arrange the required network connectivity. We “thought” everything was in place but the CMG wizard still failed - 


- “with status code 'Forbidden' and reason phrase 'Server failed to authenticate the request. Make sure the value of Authorization header is formed correctly including the signature”.

I got some help from the product group on this one. They'd seen this in testing and said that the error was probably due to a time difference between the service connection point and the real world. A SAS URL is created based on the time on the service connection point and if the time is ahead then the deployment package is not yet valid on Azure.

Sure enough we checked the time and it was slightly out. Setting the clock back did the business and we could complete the wizard and deploy the CMG.

Any more tips?

Have you any CMG tips? Let me know and I'll add them. Thanks.

Until next time....

Do we have to enable some Azure resource providers first? (@RahulJindal)

Yes, the Microsoft.ClassicCompute and Microsoft.Storage resource providers are classic services and are not registered by default. They must be registered within the Azure subscription.


Search for your Subscription and select Resource providers


Locate Microsoft.ClassicCompute and Microsoft.Storage and register them.

These resource providers are not available with a Cloud Service Provider (CSP) subscription. Therefore CMG cannot be deployed using a CSP subscription.

Friday 6 March 2020

CMG wizard - no subscription ID

I was creating a Cloud Management Gateway for a ConfigMgr customer today and encountered this little issue. I signed into Azure but the wizard did not detect the subscription.


This was a little odd as the account I was using was a Global admin in Azure AD and Owner of the subscription. Also I’d had no problem setting up the Azure Services.


This gave me my first clue and told me that my account was only a Contributor. However I knew that the account was a member of two Azure groups. One group made me Owner on the subscription and the other made me a Contributor. Removing myself from the Contributor group did the trick.....


 ....and I was in business. 

Until next time.....