Monday 17 December 2018

First look at Windows 10 Security Baselines - Intune public preview

(First published in Dec 2018 but I was too early so I withdrew the post 😃)

This has been one of the most requested Intune features for quite some time and, yesterday, it was released as a public preview in Intune 1901. What is it all about? You can find the official documentation here

For many years now we have relied on Microsoft to provide guidance on the security settings that we should configure. In the on-premise Active Directory world we don't want to analyse every possible GPO that is available. That's why we implement the Microsoft security baselines as a starting point and then we change individual settings as required. Microsoft have now provided Windows 10 security baselines for the Intune MDM-managed world. I tested it today and it's really easy to implement. It works well too.

Remember that this is a public preview only and is only supported with Windows 10 version 1809 and later. It is not yet recommended for production.

So where do we start? In the Azure portal, navigate to All Services and search for Intune. Select Security Baselines (Preview).


Launch Security Baselines and we can see the Preview: MDM Security Baseline for October 2018 (beta).

Drill into the baseline. Click Create profile.


Enter some details (Name and Description) for your baseline (profile). The platform and baseline drop-down arrows are grayed out. These will probably become available as more baselines are released for different Windows 10 versions.


Have a look at the Settings. These are the kind of security heading that you would expect.


"Block toast notifications on locked screen" is enabled in the baseline. I'll check for that in my test computer in a minute.


The Browser settings look secure.....


....and these are the Device Lock settings. See that we will prevent the reuse of the previous 24 passwords. That's pretty secure. I'll check that on my test client also.


Once the profile has been created it should be assigned to a group (of devices or users).


Ok, on my test device, I've initiated a manual sync. Otherwise I'd have to wait up to 8 hours.


I've generated an MDM Diagnostics report.


These are the results. I can see that DevicePasswordHistory is now configured for 24. 


AllowToasts is now disabled.


So what happens if I make a change to a baseline? Let's change the toast notification setting to Not Configured.

After a manual sync I can see that this setting is no longer managed.

I can see a lot of potential with this feature. Try it out (although not in production yet).

Until next time......

Thursday 6 December 2018

Wake on LAN in ConfigMgr 1810 and 802.1x authentication

I recently carried out some testing on the new Wake on LAN feature of ConfigMgr 1810 and published the result in this blog post. One of the things I pointed out was that the feature was not supported using 802.1x authentication. I wondered why so I carried out some additional research.

As with all Microsoft support statements, just because something is not supported doesn't mean that it will not work. It's either untested or will not work in all scenarios. This is the case with WoL and 802.1x authentication.

802.1x is a standard for port-based network access control that provides authenticated network access to 802.11 wireless networks and wired Ethernet networks. Port-based network access control uses the physical characteristics of a switched LAN infrastructure to authenticate devices that are attached to a LAN port and to prevent access to that port in cases where the authentication process fails. One of the features of 802.1x is that devices are quarantined when they are turned off. Therefore the switch ports becomes blocked in both directions and prevents the WoL magic packet from being delivered - a chicken and egg situation. 

I figured that this couldn't a new problem and that it would be possible to overcome this in the enterprise. I was right. I researched the main networking vendors and found that they had solutions.

Cisco

The 802.1X authentication with Wake-on-LAN (WoL) feature solves the problem. When a host that uses WoL is attached through an 802.1X port and the host powers off, the 802.1X port becomes unauthorized. The port can only receive and send EAPOL packets, and WoL magic packets cannot reach the host. When the PC is powered off, it is not authorized, and the switch port is not opened.

When the switch uses 802.1X authentication with WoL, the switch forwards traffic to unauthorized 802.1X ports, including magic packets. While the port is unauthorized, the switch continues to block ingress traffic other than EAPOL packets. The host can receive packets but cannot send packets to other devices in the network. 
  • When you configure a port as unidirectional by using the dot1x control-direction in interface configuration command, the port changes to the spanning-tree forwarding state. The port can send packets to the host but cannot receive packets from the host. 
  • When you configure a port as bidirectional by using the dot1x control-direction both interface configuration command, the port is access-controlled in both directions. The port does not receive packets from or send packets to the host.
Note: If PortFast is not enabled on the port, the port is forced to the bidirectional state.

https://www.cisco.com/en/US/docs/ios-xml/ios/sec_usr_8021x/configuration/15-2mt/sec-ieee-wake-lan-supp.html

HP

The aaa port-access controlled-direction in command allows Wake-on-LAN traffic to be transmitted on an 802.1X-aware egress port that has not yet transitioned to the 802.1X authenticated state; the controlled-direction both setting prevents Wake-on-LAN traffic to be transmitted on an 802.1X-aware egress port until authentication occurs.

Note: Although the controlled-direction in setting allows Wake-on-LAN traffic to traverse the switch through unauthenticated 802.1X-aware egress ports, it does not guarantee that the Wake-on-LAN packets will arrive at their destination. For example, firewall rules on other network devices and VLAN rules may prevent these packets from traversing the network.

http://h22208.www2.hpe.com/eginfolib/networking/docs/switches/WB/15-18/5998-8152_wb_2920_asg/content/ch13s05.html

Aruba Networks (not Procurve)

In Aruba AOS (not Procurve) there is a MAC pinning feature which basically adds a static MAC address to the port and associates it to the authentication as a pinned-MAC. All traffic to that MAC address would be pre-authenticated and anything else would need to be authenticated.

Summary

For enterprise grade edge switches I would expect a solution for this problem. You may not be so lucky with low end switches and your mileage may vary. That's why this solution is not officially supported by Microsoft.  
 
I hope this helps. Until next time.......

Tuesday 4 December 2018

Major Wake on LAN improvement with SCCM 1810

This has been an eagerly awaited feature. It's been on Uservoice since May of last year and has now been released to production in SCCM 1810. You can now wake up clients from the Configuration Manager console, even if the client isn't on the same subnet as the site server. The site server uses the client notification channel to identify another client that's awake on the same remote subnet. The awake client then sends a wake on LAN request (magic packet). I must admit that I was a bit sceptical about this but I've now tested it in my lab and it just works - I was pleasantly surprised. 

Wake on LAN has been a difficult solution to implement with Configuration Manager for many years. It has worked perfectly on the local subnet but could be problematic for remote subnets.

Why is that?

Let's start but by discussing exactly what it is. Wake-on-LAN (sometimes abbreviated WoL) is the industry standard for waking computers up remotely from a very low power mode. WoL is usually configured through the network card’s firmware, so you don’t need specific software to enable it. Support for Wake-on-LAN is now pretty universal and you can expect that the functionality would be available on any computer purchased in the last ten years.

Wake-on-LAN-enabled computers wait for a “magic packet” to arrive that includes the network card’s MAC address in it. These magic packets are often sent by a management solution (e.g. ConfigMgr). The typical ports used for WoL magic packets are UDP 7 and 9. Magic packets are usually sent over the entirety of a network and contain the subnet information, network broadcast address, and the MAC address of the target computer’s network card.

WoL magic packets are not routable so configuring the solution for remote subnets has always been problematic. Microsoft previously developed the wake-up proxy to help with this situation but that solution also carried a health warning. In certain circumstances (i.e. when you're using port-security) wake-up proxy could lead to disruption and loss of service. Wake-up proxy caused the network switch to believe that a different network adapter was using the port than the one that was registered. This behaviour is known as a MAC flap and is unusual for standard network operation. Some network monitoring tools look for this behaviour and can assume that something is wrong. Consequently, these monitoring tools can generate alerts or shut down ports when you use wake-up proxy. It was recommended not to use wake-up proxy if the network monitoring tools and services did not allow MAC flaps.

With this new solution in 1810 the site server uses the client notification channel to identify another client that's awake on the same remote subnet. It's all pretty straightforward to configure so let's have a look. Remember this solution allows you to implement a remote WoL solution without having to configure any networking.

SCCM side:

This part hasn't changed from the original WoL configuration.
  • In the ConfigMgr console navigate to Administration > Site Configuration > Sites.
  • Select the site, right click and select Properties.
  • Click the Wake on LAN tab

  • Check the box next to "Enable Wake On LAN for this site:"
  • Select a WoL transmission method
As the name suggests, subnet directed broadcasts send the packet to all computers on the remote subnet and is the most reliable transmission method. Unicast broadcasts send the packet only to the targeted computer. 

  • Click on Advanced to see the WoL transmission options. To make the solution more reliable you may choose to increase the number of retries.
  • Select the Ports tab of the site properties. The default WoL port in ConfigMgr is 9. For security reasons Microsoft recommends that you change this to a more obscure port (I've left it at 9 for now).
  • Save the configuration
Log files

You will notice that two new log files are created on the site server. There are no client-side log files for WOL.

  • WolCmgr.log: Contains information about which clients need to be sent wake-up packets, the number of wake-up packets sent, and the number of wake-up packets retried.
  • Wolmgr.log: Contains information about wake-up procedures, such as when to wake up deployments or deployments that are configured for WOL.
Client side configuration

This involves configuration of the NIC properties. Right click on your network card and choose Configure, then click on the Advanced tab.


Scroll down in the list to find Wake on Magic Packet. Change the value to Enabled. The other “Wake on” settings are not required.


Click the Power Management tab, and make sure the "Allow this device to wake the computer” and “Only allow a magic packet to wake the computer” boxes are enabled.

You need to ensure that these options are set for all the computers you will need to wake up. That could be a pain to do manually. Terence has a good blog post on creating a ConfigMgr CI for this.

Testing

Now let's have a look at the new functionality. What do you need?


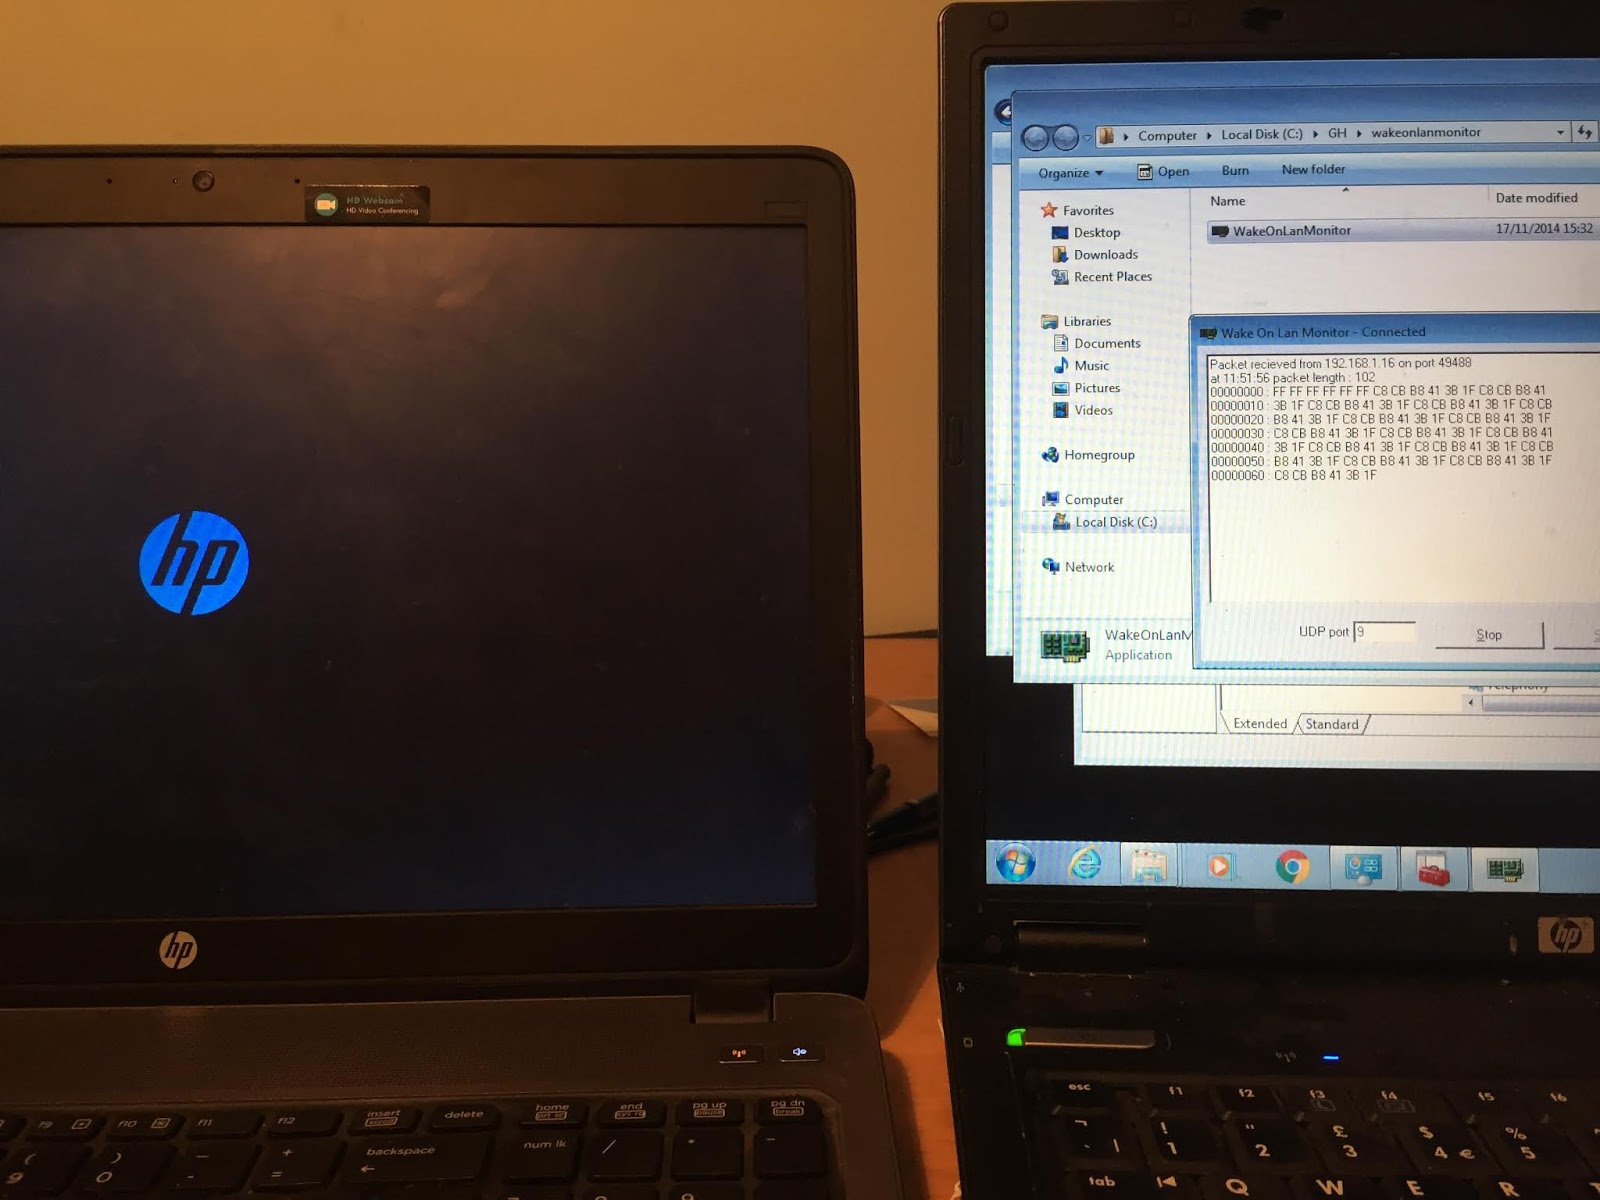
This is the "remote subnet" of my lab. I have two laptops with the NICs configured for WoL and the ConfigMgr client installed.
  • Client 1 is turned off
  • Client 2 is turned on with a WoL monitor running. Client 2 will receive the magic packet and will turn client 1 on
ConfigMgr cannot track the progress of wake-up packets after they are sent, but you can use any network monitoring tool to verify whether wake-up packets successfully traverse your network infrastructure and reach the computers' network segment. I've used Wake on Lan Monitor for testing. Download it from here. Run it on a machine on the same subnet as the machine you want to wake up to test if the Magic packet signal is reaching that subnet.


Right click on the computer you want to wake up. Select the Client Notification channel. See the new Wake up option. (The same action is available on a specific collection. The site tries to wake up any client in that collection that's asleep.)


ConfigMgr is pretty smart here and will know if there is no other client computer awake on the remote subnet.


I'm in luck. I have a computer that is already awake on the remote subnet. Remember I didn't configure any kind of proxy computer. I merely ensured that the NICs were configured correctly for WoL.


Success. The magic packet is detected almost immediately on client 2 (see the text in the WoL monitor) and immediately wakes up client1.


The WoL monitor shows details of the magic packet. See how I configured the port to match the ConfigMgr WoL port.

Remember that your required deployments continue to work as normal (applications, task sequences and software updates).

I was amazed at how well this works (with minimal effort). I'll now implement this at my customer sites.


Limitations

There are some limitations to the solution
  • At least one client in the target subnet must be awake. 
  • IPv6 is not supported (I presume this means it won't work over Direct Access).
  • 802.1x network authentication is not supported.

Until next time......


Thursday 18 October 2018

SCCM task sequence failing on app installations (error 80070652)

I had this problem on a customer site today and I hadn't seen it before. A task sequence failed intermittently (but often) on two particular applications (one was an SCCM application and the other a package/program). These apps had nothing in common, besides being consecutive in the task sequence.


The SMSTS.log file told me that that installations failed because:

Another installation is already in progress. complete that installation before proceeding with this install. (error: 80070652; source: windows)

I really didn't understand this as everything else looked ok in the log file. Palo Alto VPN client and MBAM were the two apps that regularly failed without any obvious reason. The only thing I could see that they had in common was that they closely followed McAfee VirusScan in the task sequence. Like many other ConfigMgr-related issues, could McAfee be the problem?

I looked at the application event log and sure enough I found McAfee-related activity long after it had returned an exit code of 0, thus allowing the task sequence to continue. Further installations were not possible as McAfee was still doing it's thing and the task sequence just failed.

To test my theory I just moved the McAfee installation to the end of the task sequence. That did it and the task sequences all compete successfully now. Happy days.

Guess what? I just left it there where it belongs :)

I hope this is helpful to anyone else who encounters this behaviour. Until next time...


Monday 24 September 2018

Intune - sidecar for Win32 apps revealed

Traditionally it has not been easy to deploy applications to Windows 10 devices managed by Intune. There is a great solution for deploying Office 365 ProPlus. Also, it's always been easy to deploy single file MSIs and that's great. However how many apps do we admins get to deploy that are packaged very nicely by the vendor into single MSI files? Not many I'd say. Usually we get a .exe file or in fact the installation files contain multiple folder and files.

So what have our choices been to deal with this? 
  • Repackage EXEs & MSIs with multiple files to a single file MSI using 3rd party tools (e.g. Flexera Admin Studio) - can be complex.
  • Convert apps to .appx using the desktop bridge - the desktop app converter is Microsoft’s utility to do this and it's is not a straightforward tool to use.
  • Deploy apps using PowerShell scripts - this is very powerful and uses the Intune management extension in conjunction with Azure blob storage.
The Intune management extension (codename sidecar) supplements the native Windows 10 MDM capabilities. So, how does it work? How do we get the management extension on to the devices?

Well, it’s just an MSI itself and we’ve been able deploy MSIs for quite some time. If a PowerShell script is assigned to a user and the Intune management extension is not already installed on a device, it will be pushed down to the device automatically by Intune. You’ll be able to see it as a service and in Programs and Features. You'll also get a new folder structure and access to log files (IntuneManagementExtension.log for example)

The agent then checks for policy every 60 minutes. Remember the device itself only syncs every 8 hours? You can force the device to sync immediately by restarting the “Microsoft Intune Management Extension” service.

That sounds really cool, doesn't it and it is really cool. Wouldn't it be great if sidecar could be used natively to deploy .exe files without the need for scripts and independent Azure storage. Well Microsoft have been listening.


This has now been announced at Ignite so we can finally talk about it. The Intune management extension now supports native Win32 app deployment. This is made possible by the introduction of a new file extension that can be uploaded to Intune - the .intunewin file.

I've been able to get an advance preview of this so let's walk through the process

Prerequistes:
  • Windows 10 version 1607 and later
  • Windows 10 edition (Enterprise, Pro, Edu, IOT Core, IOT Enterprise Core)
  • Device must be Azure AD joined and Intune enrolled
Prepare the app

Microsoft have developed a new tool, the Microsoft Intune Win32 App Packaging Tool, to pre-process Win32 apps. The packaging tool converts application installation files into the .intunewin format. The packaging tool also detects some of the attributes required by Intune to determine the application installation state. After you use this tool on the app installer folder, you will be able to create a Win32 app in the Intune console. I've used it and it works really well.

You can download the tool from GitHub

You will also find the command-line parameters available for the tool.


Copy the app to a source folder. I've 7Zip for this test and it's small and quick, and it's an exe file. We've not been able to deal with this easily up to now.


Intune Win32 App Packaging Tool is a command line tool. Browse to the location and launch the tool. Specify the source location of the app (7Zip for me).


Specify the location for the output file. The tool executes and finally produces the .intunewin file....


...which you'll find in the output folder.

Upload the app


Now we can add the app in Intune, select the new file type available (at the bottom). This is not yet generally available.


Browse to the .intunewin app in the App package file pane.


Configure the app information.


Configure the program details. Note that you must know the silent installation (and uninstall) parameters.


Configure the requirements. You must enter OS architecture and minimum OS.


Configure the detection rule. We know all about this from ConfigMgr. We can choose MSI product code, presence of file or folder or registry value. I'm using the file-based option.


This is our detection rule.


I've accept the default return codes.


The app is uploaded to Intune and created.


Assign the app to an Azure AD group as normal.

Behavior on device.

My test device has already been used for testing of app deployment using PowerShell script. Therefore the Intune management extension is already installed. I've restarted the service to get immediate action.


I'm notified that software changes are required. The IntuneManagementExtension log file also tells me that a Win32App is about to be installed.


Installation is finished.

App is installed.

This is a huge step forward for software deployment to Windows 10 devices with Microsoft Intune. It is now much easier to deploy business Windows apps to MDM-enrolled devices. This can simplify your shift to the modern desktop. You don't have to change of course. If you're currently using ConfigMgr to deploy apps then keep doing that, as it works really well. If you want to go to modern desktop this new feature will remove a major roadblock.

I hope it helps you. 


Until next time........


Monday 3 September 2018

Intune - improvements to Office 365 ProPlus deployment

Simplified Office 365 ProPlus deployment has been a very popular feature of Microsoft Intune for quite some time. In the last few weeks there have been two improvements that will be very useful.

1. Now we can edit Office 365 ProPlus app deployments if we want to make changes, remove an app or change the channel, for example. Previously we had to delete the deployment and add a new one which was a real pain.


Editing the Office 365 ProPlus deployment

2. We also have greater control as we can now choose the specific version of Office 365 ProPlus to install. We don't have to accept the latest version any more.

Choose App Suite Settings in the properties of the deployment. In the section "Version to install on end user devices" choose Specific.

You now must choose a version.

There are many to choose from and the choices will change as the list is continually updated. 

Why is this significant? In my opinion it's very important to be in control of the version of software that you deploy to your estate. You need time to test your line of business apps, add-ins and macros so perhaps you don't want to be deploying the latest version as soon as it is published.

To me these are two very useful features. Until next time......


Wednesday 1 August 2018

ConfigMgr - PXE without WDS

ConfigMgr Current Branch 1806 will shortly be released. One of the most eagerly awaited features (my favourite) is that we can now enable PXE on our DPs without Windows Deployment Services (WDS). This is an enormous step forward as it will save customers money. I have customers with many PXE-enabled DPs throughout the world. That's a lot of server licensing. Previously a server OS was required simply for WDS. Now we can use a desktop operating system for the DP and enable it to use a lightweight PXE responder. That will save customers a lot of money. Let's have a look at that.


This is the traditional server DP with WDS.


Remember the RemoteInstall folder.


Now we have a new checkbox when creating a DP - Enable a PXE responder without WDS


We're told that selecting this option will disable WDS on existing DPs. Also we can see that the new service does not support multicast. I can live with that.


Understandably Multicast options are now greyed out in the wizard.


This is what the folder structure looks like on a PXE-enabled Windows 7 DP, no RemoteInstall folder. Wow.


This is the new lightweight ConfigMgr PXE Responder Service. Who needs WDS?


We can see the path to the executable file sccmpxe.exe.


This is where the SCCM PXE files are located.


I can PXE boot as normal. See the way we're told that SCCM PXE now provides this service (not WDS).


This is a really cool feature and will save many customers a lot of money on server licensing. It's a good enough reason alone to upgrade to ConfigMgr Current Branch 1806. 

I hope this was useful. Until next time....