Showing posts with label Azure Active Directory Premium. Show all posts

Sunday, 14 May 2023

Managing local admins on Azure AD Joined devices

We've been able to do this for quite some time. We've been able to add individual users as local administrators on Azure AD joined devices. More recently this has become a lot easier. We can now use Azure AD groups to manage this. With Azure AD Premium P1 or P2, you can create a role-assignable group and assign the Device Administrator roles to the group.

There are some additional considerations. Firstly, you can only configure a group to be role-assignable when you create the group. You cannot change this afterwards.


I've created a group called "Local admins test 1". See the configuration "Azure roles can be assigned to the group". I've toggled this to yes.


We're told that we cannot change this setting after the group is created.


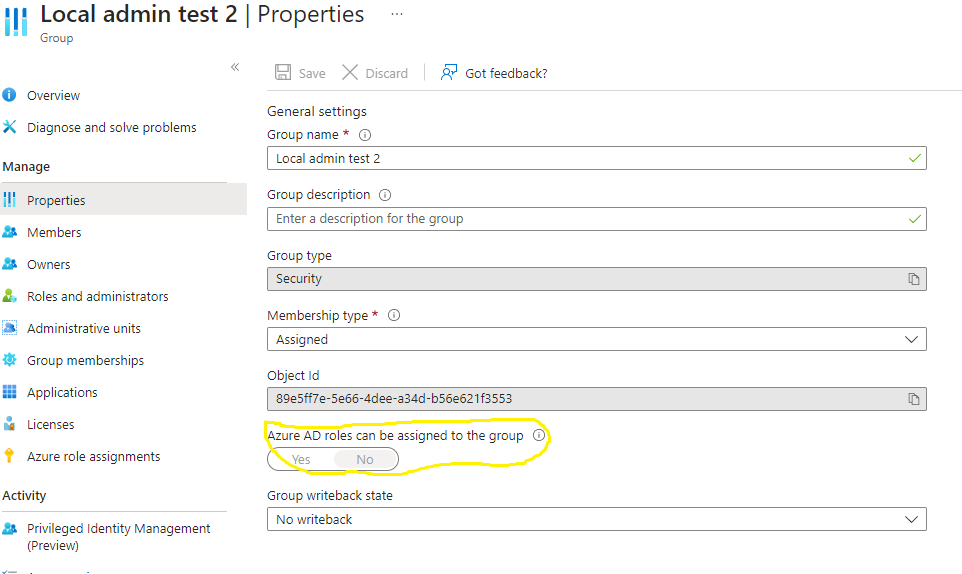
Next I've created a group called "Local admins test 2". This time I didn't select that Azure roles can be assigned to the group.


You can see that this setting cannot be turned off after the group has been created.


It can't be turned on either.


Now when I add an assignment to the Device Administrators role, only "Local admins test 1" is available for selection.

Note that you must be a Privileged Role Administrators or Global Administrator to create the group in the first place. 


If you are not then the 
"Azure roles can be assigned to the group" option is not available (you can't even see it).

Finally this option is only supported for Assigned groups.


Just for kicks I've selected Dynamic User.


However it automatically changes to Assigned and greyed out, once I toggle the option to Yes. 

I hope this helps. Until next time.......


Wednesday, 14 December 2022

Windows 10 devices not enrolling in Intune

This is just a quick post to describe a customer issue I encountered this week. Customer had previously configured Azure AD Connect and all devices were hybrid joined. They had just implemented a GPO to enrol the devices into Intune

Administrative Templates > Windows Components > MDM > Enable automatic MDM enrollment using default Azure AD credentials

However no devices were enrolled.

I looked a the event viewer on one of the devices and this told me where the problem was. In the DeviceManagement-Enterprise-Diagnostics-Provider log I saw this error

Auto MDM Enroll: Device Credential (0x0), Failed (Unknown Win32 Error code: 0x8018002b)

I figured that this was nothing to do with credentials but was caused by the user not being assigned a license. I was half right. The user had been assigned a license but it was a standalone Intune license. This is not enough for automatic Intune enrollment, that also requires an Azure AD Premium P1 license. I explained that it was still possible to enrol each device manually, but advised that wasn't a sustainable approach. 

Customer cancelled the Intune licenses and EM+S E3 licenses were provisioned. Problem solved and devices are now being automatically enrolled.

Moral of the story: Standalone Intune licenses are not recommended. You "may" get away with them if you are just managing mobile devices (Android & iOS), but not when you are managing Windows. EM+S or M365 is recommended.

Until next time....


Thursday, 28 November 2019

Test driving Windows Virtual Desktop

This week I've been working with Windows Virtual Desktop (WVD) for the first time. Microsoft announced General Availability in September and I'm just getting to it now. I think it's great. What's not to like? We can now deploy a Remote Desktop solution in Azure without having to worry about the underlying infrastructure (RD Gateway, an RD Connection Broker, and RD Web Access).

I've captured my experience in this blog post. It's pretty long so I've divided it into the following sections to make it easier to read.
  • What is Microsoft Windows Virtual Desktop?
  • Is it the same as Microsoft Managed Desktop?
  • Windows Virtual Desktop prerequisites
  • Setting up Windows Virtual Desktop
  • Working with Windows Virtual Desktop
  • Advanced configuration (with RemoteApp, FSLogix containers and MSIX App Attach)

What is Windows Virtual Desktop?

WVD allows you to deploy and scale virtualized Windows desktops and apps on Azure. It can be deployed in minutes and offers simplified management, multi-session Windows 10 and optimizations for Office 365 ProPlus. We can deploy VMs with Windows 10 or Windows Server 2016. We can also use our own custom Windows 7 images. As an added bonus this includes free extended support for Windows 7 (extended security updates for three years). That's a no-brainer.

Is this the same as Microsoft Managed Desktop?

No, Microsoft Managed Desktops is something different. This is also a cloud service but Microsoft will manage Windows 10 and Office 365 ProPlus on your hardware. Obviously Microsoft will only support this on a specific list of devices.

This service includes the management of:
  • hardware (once it's on the approved list and registered)
  • software updates
  • Office 365 ProPlus and LOB apps as appropriate
  • end user device deployment
  • security monitoring and response

OK, so back to WVD.

Windows Virtual Desktop Prerequisites

There are some requirements before you can get started.
  • Licenses - you should consult the official docs  but I have Microsoft 365 E3 for testing.
  • Obviously we need an Azure subscription - this will cost you money (but not too much).
  • User accounts - you'll need to nominate a WVD Tenant Creator and some test host pool users.
  • You need to decide what directory services you will use to support your infrastructure. You can use Azure AD, DC hosted in Azure or a DC hosted on premises with a VPN to Azure. The Azure VMs that you create can be AD-joined or hybrid AD-joined (not Azure AD-joined.
  • Azure network - you need to have a virtual network in Azure. Remember you don't configure DHCP in Azure virtual networks. IP addressing is dynamic based on the assigned subnet. 

  • I'm using a DC hosted in Azure so I configured a static DNS record for the DC in the properties of the virtual network. This way my VMs will be able to join the domain.
  • Download and install the Windows Virtual Desktop PowerShell module. Launch PowerShell as administrator and run:
         Install-Module -Name Microsoft.RDInfra.RDPowerShell
  •  Then import the module:
          Import-Module -Name Microsoft.RDInfra.RDPowerShell

Setting up Windows Virtual Desktop

Now let's get started setting up the environment. The first thing we need to do is to allow Windows Virtual Desktop services to access the Azure AD tenant. For this we'll need the tenant ID (also referred to as Directory ID).


We can get the Directory ID in the properties of Azure Active Directory. Copy it be clicking on the blue box to the right. You'll need this a couple of times during this process.


Now navigate to https://rdweb.wvd.microsoft.com (this is Windows Virtual Desktop services). Add your tenant ID and click Submit for the Server App.


Accept that you are granting permissions to WVD.


This was successful.


Repeat the process for the client app.


Accept the permissions.

Enjoy the success. Now that we've granted access to Azure AD we need to grant permissions to a user to create a Windows Virtual Desktop tenant. Essentially we'll assign the "TenantCreator" role to a user account.

We do this in the Azure Portal.


Navigate to Azure Active Directory and select Enterprise Applications.


Select Windows Virtual Desktop and choose Users and Groups.


Select Add User and add the lucky user who will create the WVD tenant. I've chosen Fred. See that he is now a TenantCreator.

Now we'll create the WVD tenant. Remember we copied the tenant ID earlier (aka Directory ID). We're going to need it again. We'll also need the Azure Subscription ID.


It's easy to find. Navigate to your Subscriptions using the search.


You'll find the subscription ID. Now's let's create the WVD tenant. We do that using PoSH. Sign in to Windows Virtual Desktop by using the TenantCreator user account with this cmdlet:

Add-RdsAccount -DeploymentUrl "https://rdbroker.wvd.microsoft.com"

Create a new Windows Virtual Desktop tenant associated with the Azure Active Directory tenant (you'll choose a tenant name and replace the bracketed values with your tenant ID and subscription ID):

New-RdsTenant -Name <TenantName> -AadTenantId <DirectoryID> -AzureSubscriptionId <SubscriptionID>


The WVD tenant has been created. Now we'll deploy a host pool of virtual desktops. Sign into the Azure Portal and select Create a Resource.


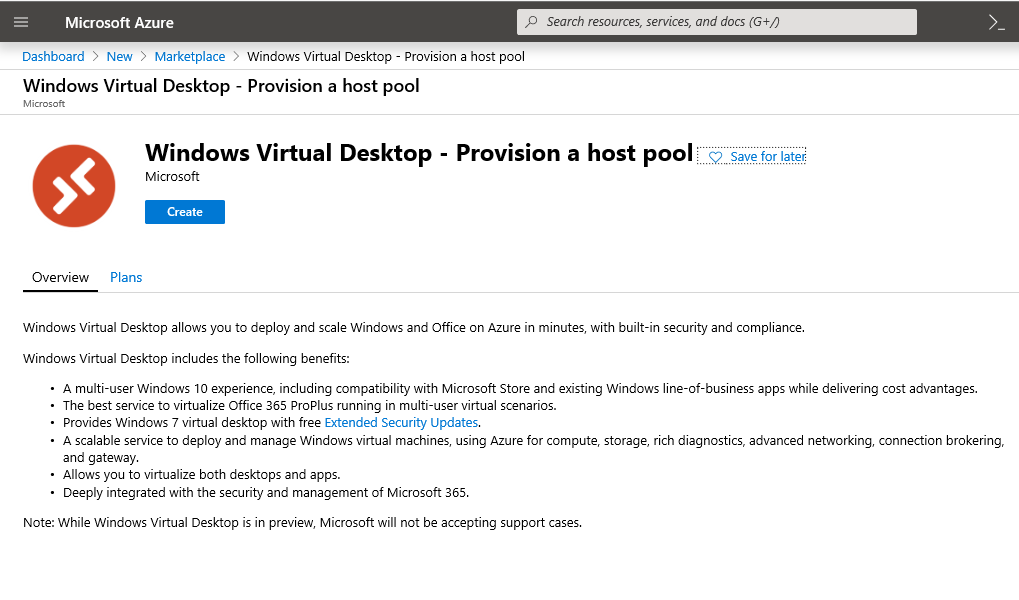
Search for Windows Virtual Desktop and select Windows Virtual Desktop - Provision a host pool.


Choose to Create a host pool. There are four pages of details to configure.


The first page has some basics.
  • Choose the subscription that you want to use (there will be a cost).
  • Select a Resource Group. It needs to be empty so you'll probably create a new one here.
  • Select your region.
  • Enter a name for the host pool.
  • Choose the desktop type. Personal is where every user has a dedicated VM. I've chosen pooled.
  • Configure the users that will log into these VMs (comma-separated list). Note that you'll also need to enter the TenantCreator here if he will need access. It is not automatic.


The next page is for our expected usage. This determines how many VMs will be deployed. Click Change Size if you want to change any VM details. I'm conscious of cost in my lab so I've done that. Also enter a prefix for the names of the VMs


The third page allows you to configure the VMs. Choose the following:
  • Image Operating System - I've chosen Windows 10 Enterprise multi-session with Office 365 ProPlus.
  • Disk type - I've chosen Premium SSDs for performance.
  • Domain join account and password - the account must already be configured on the domain. This requires password complexity so be careful here.
  • Domain and domain OU - remember the VMs must be able to find the DC
  • Virtual network and subnet - make sure your DNS configuration is in place.

The final page asks for the WVD tenant details. Enter the tenant name and the owner account details. That's Fred, who created the tenant.


Finally you're asked to review your configuration and then Create the host pool.


The deployment is underway. You can see the detailed steps.

The deployment has completed.


The VMs have been created......


…..and joined to the domain.

Working with Windows Virtual Desktop

There are two ways to access the WVD pool from a desktop.
  • Remote Desktop client
  • Browser (HTML5 client)
I'm going with the full client option. You can download from here


It's an MSI installer so just run and install as normal.


On the first launch you have to Subscribe to WVD.


Sign in as a permitted user.


Looks like we're in business.


I can see my WVD host pool......


….and I've signed into one of my VMs.


I can now work normally. I can browse to fileshares on one of my servers hosted in Azure.

Advanced WVD configuration

So what's next? We can get lot more advanced with WVD and I will when I have more time.

Management Tool

You cannot manage WVD host pools in the Azure portal. You can manage the pool using PowerShell or you can create you own management UI.

http://gerryhampsoncm.blogspot.com/2019/12/deploy-management-tool-for-windows.html

RemoteApp


We can create a RemoteApp app group and publish individual Start menu apps.

FSLogix profile containers

The WVD service offers FSLogix profile containers as the recommended user profile solution. 

http://gerryhampsoncm.blogspot.com/2019/12/use-fslogix-containers-for-windows.html

MSIX App Attach

MSIX app attach is where the application (stored in MSIX format on a central location) is attached to the operating system. After attaching, applications look and feel as locally installed to the user as well as the operating system.

That's it for now. I've enjoyed test driving Windows Virtual desktop. You can get more information in the official docs

Until next time.......


Thursday, 11 July 2019

AutoPilot hybrid - issue resetting devices

Issue

I'm implementing an AutoPilot process for a customer at the moment involving hybrid AAD join of Windows 10 1809 devices (Lenovo T480 laptops). In general the AutoPilot process works. However we ran into trouble when we retired or reset a device that had been previously joined to Azure AD. The behaviour was consistent and the devices never joined AD or AAD.


After sign in the devices were stuck on "Please wait while we set up your device". (The screenshot above shows 1809 VM on the left and 1903 on the right).

After about 30 minutes they would fail with:

“Something went wrong. Confirm that you are using the correct sign-in information and that your organization uses this feature. You can try to do this again or contact your system administrator with the error code 80070774”


This suggested that there was something preventing the Offline Domain Join from completing and the process timed out. I researched the problem and saw that I wasn't alone. Similar issues were reported in the TechNet forums.


  • I made sure that the devices did not still exist in AD or Azure AD but it did not make any difference.
  • Also I made sure that the ODJ profile was assigned to a dynamic group of my AutoPilot devices. Remember the solution worked perfectly first time around. It only gave trouble when the devices were reset.
  • The AutoPilot device group was based on the presence of the ZTDId attribute.
Workaround

I reached out to the product group and Michael Niehaus gave me some advice. He suggested that only way to get it to reliably work was to remove all the device objects (AAD, Intune, Autopilot) and then re-import the device to Autopilot to start over. He also suggested a possible workaround. Target the Domain Join device configuration policy to "All Devices" instead of AutoPilot devices only as that would help with the ODJ timeout problems. 

That's what I did. I changed the targeting and it worked. The devices joined both AD and Azure AD as normal. Thanks Michael.

I hope this helps you if you find yourself in the same situation. 

Until next time......


Monday, 8 July 2019

AutoPilot CSV file formatting issues

I've been uploading hardware IDs to Intune for my customer so that the devices can be provisioned using AutoPilot and Intune. We create CSV files in batches of 50 and everything has been going well so far. However the process started to fail today.


Intune would not accept the formatting of the CSV files. 

Each row must have a minimum of 3 columns

The formatting looked ok to me though. It was a CSV file of 50 devices created using the -append parameter.

Get-WindowsAutoPilotInfo.ps1 -OutputFile .\batch1.csv -append

The project leverages Microsoft Teams for collaboration and I subsequently discovered that the files had been uploaded to Teams and downloaded again. This must have caused some subtle issue with the formatting. Once I got the original files I was able to continue as normal.

I've also noticed that a simple edit of the CSV file can cause formatting issues. There was a duplicate line in one of the files but simply deleting the line caused an issue.


In the end I uploaded the file with the duplicate and just accepted the import error.

I hope this helps anyone else scratching their head with AutoPilot CSV formatting issues. My advice:
  1. Use the original CSV file only
  2. Keep editing of the CSV file to a minimum
Until next time....

Thursday, 30 May 2019

Deploying Intune Connector for AD with a web proxy


I'm working on a Windows AutoPilot solution for a customer this week. This is a hybrid AD solution and the devices will join both Azure AD and the corp AD. I had previously deployed the Intune Connector for Active Directory for testing purposes and it's pretty straightforward. However it's a little different in an enterprise environment. 


I successfully installed the connector on a Windows Server 2016. However the connector never appeared in Intune. There were many errors in the ODJ Connector event logs


Example
"We are unable to complete your request because a server-side error occurred. Please try again. [Exception Message: \"DiagnosticException: 0x0FFFFFFF. We are unable to complete your request because a server-side error occurred. Please try again.\"] [Exception Message: \"Failed to get a value for Key: OdjServiceBaseUrl\"] [Exception Message: \"The given key was not present in the dictionary.\"


The proxy log files showed no activity so clearly I needed some way to ensure that the tool was directing traffic to the proxy.

This document discusses using the tool with on-premise proxies


However, it’s really not useful as it just recommends bypassing the proxy and configuring the tool (ODJConnectorUI.exe.config and ODJConnectorSvc.exe.config) to do that. We all know that is not practical. Most enterprise customers won’t allow you to bypass the proxy so I needed a way to make the Intune Connector use the proxy.

  • Configuring the proxy in IE does not work
  • Using “netsh winhttp set proxy” does not work 
Michael Niehaus worked on this and provided the code to add to the config files.


It worked perfectly and the Intune Connector was created (you have to restart the Intune ODJConnector Service).

The documentation will be updated accordingly. 

This is the code snippet that should be added to both the ODJConnectorUI.exe.config and ODJConnectorSvc.exe.config files.

<?xml version="1.0" encoding="utf-8" ?>
<configuration>
  <system.net> 
    <defaultProxy>  
      <proxy usesystemdefault="false" proxyaddress="http://contoso-proxy:3128" />  
    </defaultProxy> 
  </system.net>

   <startup>
    <supportedRuntime version="v4.0" sku=".NETFramework,Version=v4.6" />
  </startup>

  <appSettings>
  </appSettings>
</configuration>

 It was good to see successful communication in the event logs


Note:
It is important to include http:// in the proxy address. We didn't at first and we spotted the following in the event logs:

":"We are unable to complete your request because a server-side error occurred. Please try again. [Exception Message: \"DiagnosticException: 0x0FFFFFFF. We are unable to complete your request because a server-side error occurred. Please try again.\"] [Exception Message: \"The ServicePointManager does not support proxies with the xxx.int.domain.com scheme.\"]" 

I hope this helps someone to configure the Intune Connector for Active Directory behind a web proxy.

Until next time....