Flexible work arrangements and accelerating digital transformation have changed the way we need to secure access. Organizations need an easier, more agile approach to protecting access to all applications and resources. Traditional network security approaches like VPNs don’t scale to these modern demands, they don’t give end users a good experience, and they grant excessive access to the entire corporate network. All it takes is one compromised user account, infected device, or open port for an attacker to access and laterally move anywhere inside your network. Neither identity nor network security controls alone can fully protect all access points. Even if you’ve adopted modern but disjointed access solutions you may leave security gaps that skilled adversaries can exploit. So, you still need to integrate them to address these challenges.
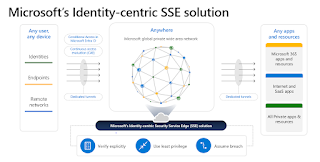
Microsoft's identity-centric Security Service Edge (SSE) solution helps organizations secure access to any app or resource, from anywhere. Conditional Access policies can be enforced that consider identity, device, application, and now network conditions with any application or website.
The Microsoft SSE solution contains two products announced last year, Microsoft Entra Internet Access and Microsoft Entra Private Access.
This model is built on Zero Trust principles. It helps to verify each identity and uses risk-based context, giving users access only to applications, resources, and destinations they need to do their job. With Identity and Network Access solutions working together, organizations can bridge the gaps across multiple tools in one place and configure unified identity and network access controls with Conditional Access in Microsoft Entra.
Microsoft Entra Internet Access is an identity-centric Secure Web Gateway (SWG) for SaaS apps and internet traffic that extends Conditional Access policies to protect against malicious internet traffic, unsafe or non-compliant content, and other threats from the open internet. For example, you can block access to all external destinations for your high-risk users or non-compliant devices except limited URLs needed by the user to recover.
I will concentrate on Microsoft Entra Private Access for this blog post. You are probably familiar with Application Proxy in Microsoft Entra, which thousands of organizations use to access private web apps today. Microsoft Entra Private Access is an even better solution and is currently in Preview. It is a complete, identity-centric Zero Trust Network Access (ZTNA) solution that shares the same application connectors but offers so much more, to help organizations simplify and secure access to any private resource, port, or protocol.
For the Entra Private Access blog post we'll concentrate on the following high level steps. Try it in your lab.
- Prerequisites
- Enable Global Secure Access
- Enable Traffic Forwarding
- Install the Connector
- Create Connector group
- Create and publish a private application
- Assign user/group to private application
- Install the Global Secure Access client
- Test and verify private access
- Logs
- Mobile devices
- Conditional Access
Prerequisites
Ok, as always there are some prerequisites to get this working.
- Admin user with one of the following roles: Global Secure Access Administrator, Application Administrator, Security Administrator
- Server to install connector (essentially the application proxy, you'll need local admin rights)
- A server with RDP enabled plus a fileshare
- Test user with Entra ID P1 license (M365 E3 does the trick 😀😀) (see note below *)
- Test client:
- Windows 10/11 64-bit
- Entra ID or hybrid joined
- Internet connection with no LAN or VPN connection to the private application
- Ability to install the Global Secure Access agent (via Intune or local admin)
Note *: Entra Private Access is currently a public preview feature so Entra P1 license is the only requirement. This will change when the feature becomes generally available. There will be an additional license cost.
Enable Global Secure Access
The first step is enable Global Secure access for the tenant.
Launch the Microsoft Entra Admin Center (https://entra.microsoft.com) and navigate to Global Secure Access (Preview) > Get Started. Click Activate.
Global Secure Access is now enabled and you can click Get Started to review the documentation for the next steps.
Enable Traffic Forwarding
Traffic forwarding enables you to configure the type of network traffic to tunnel through the Microsoft Entra Private Access service. You set up profiles to manage how specific types of traffic are managed. Private access traffic can be forwarded to the service by connecting through the Global Secure Access desktop client.
Navigate to Global Secure Access (Preview) > Connect > Traffic Forwarding
Check the box for Private Access profile.
Install the Connector
Next we download and install the Connector to link Entra to the on-premises resources. This time we navigate to Global Secure Access (Preview) > Connect > Connectors
Click Download connector service > Accept terms & Download.
We can see that the downloaded file is the installation for the application proxy connector.
Install the connector and sign in to Entra with your admin account when prompted.
The service is installed on the server.
You'll see the connector active in the Entra Admin Center.Create Connector group
Connector groups are used to assign specific connectors to applications. They give you more control and let you optimize your deployments.
Click New Connector Group > enter a name and associate with the connector.
Create and publish a private application
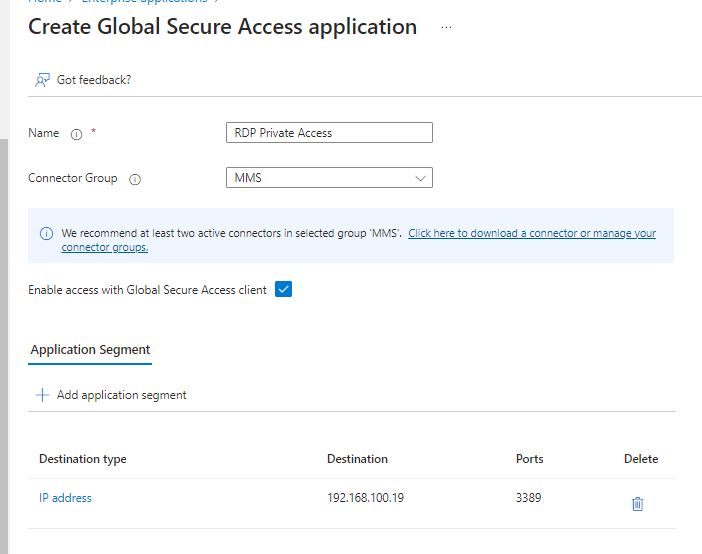
Now for the services, I want to add a private application for RDP (3389) to a specific server (192.168.10.19). I'll also add access to a fileshare (445) on the same server. Remember we could only use application proxy for web apps before.
Navigate to Global Secure Access (Preview) > Applications > Enterprise Applications
Click New Application > Enter a name and select a Connector Group. Ensure that Enable access with Global Secure Access client is checked.
Click Add application segment to add the service details. In this case I've chosen RDP (3389) to the IP address 192.168.100.19. I could have also chosen a fully qualified domain name here. In fact you can do both.
The application is ready to be assigned.
You can also use port 445 to give private access to a fileshare.
Assign user/group to private application
Now we need to assign the enterprise application to a user or group. Navigate to Global Secure Access (Preview) > Applications > Enterprise Applications
Select the application and choose Assign users and groups.
Click Add user/group and select who needs to access the application.
Install the Global Secure Access client
Navigate to Global Secure Access (Preview) > Connect > Client Download
The client is available for Windows, Android, iOS and macOS. In this case we want Windows. Download and install the client on the test device. You can automate the installation to managed devices using Intune.
Global Secure Access Client is installed.
You'll see it connected in the system tray. Make sure you've signed in with a licensed user.Have a look at the properties.
Test and verify private access
Now let's see if the solution works.
We can see that the test device is Entra joined.
We can also see that we're not on the same network as the private server and that it is not accessible.
However RDP is working, happy days.
I can also get to the fileshare over port 445.Logs
Now let's look at the logs to prove it. Navigate to Global Secure Access (Preview) > Monitor > Traffic logs
We can filter by destination IP address and see that it is being accessed by my test user over the internet.
Clicking on one of the logs brings up the activity details. You can see source and destination IP addresses and destination port, verifying that the connection was made over the internet.
Let's try another test and turn off the proxy.
We can see that the connector is not available........
......and neither is RDP. That is expected behaviour.
Mobile devices
Can we use Entra Private Access on mobile devices?
Sure we can. The Global Secure Access client is built in to Microsoft Defender for iOS and Android so it's very straightforward.
Conditional Access
We can also assign conditional access rules to the Global Secure Access client. The first thing we need to do is allow signals from the client to be used by conditional access. This is one of the features of adaptive access.
In the Entra Admin Center, navigate to Global Secure Access (Preview) > Global settings > Session management/Adaptive access. Select the toggle to Enable Global Secure Access signaling in Conditional Access.
You'll now find new Global Secure Access controls when creating conditional access policies.
I hope this blog post helps you. Until next time......