Back to ConfigMgr main menu
Back to Linux menu
I encountered a couple of issues while carrying out this work. I hope that they can save you some troubleshooting time.
1. Extracting client installation files.
The "ConfigMgr Clients for Linux.exe" file is 62MB.
This file extracts into the client installation files that you require.
You must extract this file using an x64 OS.
You will receive this error if you try to extract using x86 OS.
2. Software Distribution.
I encountered error 10006 while deploying an RPM package to a Linux Server (I was trying to deploy Teamviewer for Linux). After quite a lot of troubleshooting I finally tried to manually install the software on the server and found that the installation failed due to missing prerequisite files. Clearly my ConfigMgr deployment would never have worked and it's very difficult to determine the cause from log files.
Showing posts with label Linux. Show all posts
Monday, 17 November 2014
Linux client - software distribution and patching
Back to ConfigMgr main menu
Back to Linux menu
Previously we installed the ConfigMgr client and the Linux server is now managed and reporting normally. We are now ready to deploy software to the server. No further configuration is necessary. We should be aware of the following:
(Tip - carry out a manual test installation of the RPM package before you deploy it in production. If the RPM has some missing prerequisites the deployment will fail with error 10006. It's hard to troubleshoot this but easy to identify in a test.)
We use the traditional package/program for this patching/software distribution.
Right click Packages and choose to "Create Package".
Name the package and configure the location of the source files.
Choose "Standard Program".
The syntax of an RPM installation command is as follows:
rpm -i filename.rpm
Click Next to finish.
Don't forget to distribute the content and then you can deploy the package.
Choose a collection that contains the Linux server.
You MUST choose "Required".
You MUST choose "Download content from Distribution Point and run locally".
Carry out a quick test on the Linux server to verify that the patch is not already installed.
rpm -qa | grep ppl-0.10.2-11.el6.x86_64
(note that the file extension .rpm is not included in this command).
/opt/microsoft/configmgr/bin/ccmexec -rs policy
Test again
rpm -qa | grep ppl-0.10.2-11.el6.x86_64
Patch is now present.
Successful deployment.
Back to Linux menu
Previously we installed the ConfigMgr client and the Linux server is now managed and reporting normally. We are now ready to deploy software to the server. No further configuration is necessary. We should be aware of the following:
- The ConfigMgr client will use the Network Access account to connect to the Distribution Point and download the package to the ConfigMgr cache on the Linux server.
- You must configure the following option for your deployment - "Download content from Distribution Point and run locally".
- You must configure the deployment as "Required". "Available" is not supported for Linux servers.
- You do not need to modify the permissions of an RPM file to allow it to be executed.
(Tip - carry out a manual test installation of the RPM package before you deploy it in production. If the RPM has some missing prerequisites the deployment will fail with error 10006. It's hard to troubleshoot this but easy to identify in a test.)
We use the traditional package/program for this patching/software distribution.
Right click Packages and choose to "Create Package".
Name the package and configure the location of the source files.
Choose "Standard Program".
The syntax of an RPM installation command is as follows:
rpm -i filename.rpm
Click Next to finish.
Don't forget to distribute the content and then you can deploy the package.
Choose a collection that contains the Linux server.
You MUST choose "Required".
You MUST choose "Download content from Distribution Point and run locally".
Carry out a quick test on the Linux server to verify that the patch is not already installed.
rpm -qa | grep ppl-0.10.2-11.el6.x86_64
(note that the file extension .rpm is not included in this command).
Request Machine
Policy
/opt/microsoft/configmgr/bin/ccmexec -rs policy
Test again
rpm -qa | grep ppl-0.10.2-11.el6.x86_64
Patch is now present.
Successful deployment.
Friday, 14 November 2014
Installing ConfigMgr client on Linux Server
Back to ConfigMgr main menu
Back to Linux menu
In the last section we copied the ConfigMgr client installation files to the Linux server. Now we will instal the client.
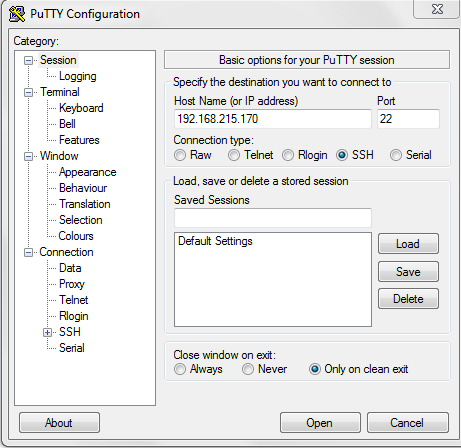
Launch PuTTY and connect to the Linux server.
Execute the following commands
cd /sccmclient
ls -l (this lists the files and shows the file permissions)
Note that all the file permissions are Read & Write (no execute). We must change this (on the "install" file) to allow execute.
You can use either
chmod 755 install
or
chmod +x install
See that the permissions have changed for the "install" file.
Now install the client. Execute the following command:
./install -mp SCCM_Server.domain.local -sitecode P01 ccm-Universalx64.tar
Client has been installed.
New folders have been created.
View the configuration file by executing the following:
more /opt/microsoft/configmgr/etc/scxcm.conf
View the end of the log file by executing the following:
tail -F /var/opt/microsoft/scxcm.log
(Tip: press ESC & q together to leave the log view and return to command line).
See ConfigMgr service (ccmexecd).
To start the client:
/etc/init.d/ccmexecd start
To stop the client:
/etc/init.d/ccmexecd stop
In the next section we will ensure that the server is Approved in ConfigMgr so that it can receive policy. We will also examine inventory.
Back to Linux menu
In the last section we copied the ConfigMgr client installation files to the Linux server. Now we will instal the client.
Launch PuTTY and connect to the Linux server.
Execute the following commands
cd /sccmclient
ls -l (this lists the files and shows the file permissions)
Note that all the file permissions are Read & Write (no execute). We must change this (on the "install" file) to allow execute.
You can use either
chmod 755 install
or
chmod +x install
See that the permissions have changed for the "install" file.
Now install the client. Execute the following command:
./install -mp SCCM_Server.domain.local -sitecode P01 ccm-Universalx64.tar
Client has been installed.
New folders have been created.
View the configuration file by executing the following:
more /opt/microsoft/configmgr/etc/scxcm.conf
View the end of the log file by executing the following:
tail -F /var/opt/microsoft/scxcm.log
(Tip: press ESC & q together to leave the log view and return to command line).
See ConfigMgr service (ccmexecd).
To start the client:
/etc/init.d/ccmexecd start
To stop the client:
/etc/init.d/ccmexecd stop
In the next section we will ensure that the server is Approved in ConfigMgr so that it can receive policy. We will also examine inventory.
Copying ConfigMgr client files to Linux server
Back to ConfigMgr main menu
Back to Linux menu
The client installation files for non-Windows devices are not provided natively with ConfigMgr 2012 R2. You have to download them independently. Navigate to the link below to download the required files.
Microsoft System Center 2012 R2 Configuration Manager - Clients for Additional Operating Systems
Click on Download to see the files available
I need the Linux files.
Downloaded Linux files (zipped).
Extract the file to a folder on your hard drive. Note that you receive an error if you try to extract using x86 OS. You need to use x64 OS.
These are the ConfigMgr client installation files for Linux servers.
-----------------------------------------------------------------------------------
Now let me introduce you to two amazing tools.
PuTTY
PuTTY is an open source SSH and Telnet client. I primarily use it for managing Linux servers and Cisco networking devices.
Download PuTTY from http://www.putty.org/
Choose the download for your platform.
Launch the executable (you do not install PuTTY). We'll get back to this tool shortly.
PCSP
PCSP (PuTTY Secure Copy) is part of the PuTTY family and can be downloaded from the same location. It is a command-line secure copy tool. Just copy pscp.exe to a folder on your hard drive.
We'll look at the use of this tool shortly.
----------------------------------------------------------------------------------
Launch PuTTY.
Connect to the Linux Server.
Log in as "root" and enter the password.
Execute this command (note that all Linux commands are case-sensitive):
mkdir /sccmclient
You have now created a folder on the Linux server. We will use this for the ConfigMgr client installation files.
Back to the local computer - we will now use PSCP to copy the client files to this folder.
Navigate to the folder where you saved the client files.
Execute the following command:
C:\Yourpath\Pscp.exe * root@192.168.215.170:/sccmclient
Back to Linux menu
The client installation files for non-Windows devices are not provided natively with ConfigMgr 2012 R2. You have to download them independently. Navigate to the link below to download the required files.
Microsoft System Center 2012 R2 Configuration Manager - Clients for Additional Operating Systems
Click on Download to see the files available
I need the Linux files.
Downloaded Linux files (zipped).
Extract the file to a folder on your hard drive. Note that you receive an error if you try to extract using x86 OS. You need to use x64 OS.
These are the ConfigMgr client installation files for Linux servers.
-----------------------------------------------------------------------------------
Now let me introduce you to two amazing tools.
PuTTY
PuTTY is an open source SSH and Telnet client. I primarily use it for managing Linux servers and Cisco networking devices.
Download PuTTY from http://www.putty.org/
Choose the download for your platform.
Launch the executable (you do not install PuTTY). We'll get back to this tool shortly.
PCSP
PCSP (PuTTY Secure Copy) is part of the PuTTY family and can be downloaded from the same location. It is a command-line secure copy tool. Just copy pscp.exe to a folder on your hard drive.
We'll look at the use of this tool shortly.
----------------------------------------------------------------------------------
Launch PuTTY.
Connect to the Linux Server.
Log in as "root" and enter the password.
Execute this command (note that all Linux commands are case-sensitive):
mkdir /sccmclient
You have now created a folder on the Linux server. We will use this for the ConfigMgr client installation files.
Back to the local computer - we will now use PSCP to copy the client files to this folder.
Navigate to the folder where you saved the client files.
Execute the following command:
C:\Yourpath\Pscp.exe * root@192.168.215.170:/sccmclient
(Yourpath will be where you saved PuTTY files, use the IP address of your Linux server, sccmclient is the folder with the ConfigMgr client files).
Enter the password and see the files copying.
Now back to our PuTTY session.
Execute the following commands:
cd /sccmclient (this changes the directory context)
ls (lists the files in the directory).
See the ConfigMgr 2012 installation files for Linux.
In the next section we will install the client.
Managing Linux clients with ConfigMgr 2012 R2
Back to ConfigMgr main menu
System Center Configuration Manager 2012 SP1 introduced an exciting new feature - the ability to manage UNIX and Linux clients. The list of supported operating systems has grown since that initial release. You can find the full list (and the names of the installation files) in the "Client Requirements for Linux and UNIX Servers" section of this TechNet Library article.
Supported Configurations for Configuration Manager
The following operating systems are supported:
Further information can be found in this TechNet article:
How to install the clients on Linux and UNIX computers
Client Push installation and automatic client push are not supported on non-Windows clients. You have to download the client installation files and manually copy them to the Linux servers. You then execute the installation manually. At that point you can retrieve hardware and software inventory. You can also automatically deploy updates and RPM files to the servers using traditional ConfigMgr packages and programs.
Please browse the following sections for details on Linux management. I have used a Red Hat Linux 6.5 Server (RHEL 6.5) for these labs.
Copying ConfigMgr client files to the Linux server
Installing ConfigMgr client
Linux client - machine policy and hardware inventory
Linux client - software distribution and patching
Issues I've encountered with Linux Management
System Center Configuration Manager 2012 SP1 introduced an exciting new feature - the ability to manage UNIX and Linux clients. The list of supported operating systems has grown since that initial release. You can find the full list (and the names of the installation files) in the "Client Requirements for Linux and UNIX Servers" section of this TechNet Library article.
Supported Configurations for Configuration Manager
The following operating systems are supported:
- Red Hat Enterprise Linux (RHEL) 4,5,6,7
- Solaris 9,10,11
- SUSE Linux Enterprise Server (SLES) 9,10,11
- Centos 5,6,7
- Debian 5,6,7
- Ubuntu 10.04 LTS,12.04 LTS,14.04 LTS
- Oracle Linux 5,6,7
- HP-UX 11iv2,11iv3
Further information can be found in this TechNet article:
How to install the clients on Linux and UNIX computers
Client Push installation and automatic client push are not supported on non-Windows clients. You have to download the client installation files and manually copy them to the Linux servers. You then execute the installation manually. At that point you can retrieve hardware and software inventory. You can also automatically deploy updates and RPM files to the servers using traditional ConfigMgr packages and programs.
Please browse the following sections for details on Linux management. I have used a Red Hat Linux 6.5 Server (RHEL 6.5) for these labs.
Copying ConfigMgr client files to the Linux server
Installing ConfigMgr client
Linux client - machine policy and hardware inventory
Linux client - software distribution and patching
Issues I've encountered with Linux Management
Subscribe to:
Posts (Atom)