Showing posts with label SCCM. Show all posts

Sunday, 20 February 2022

Microsoft Defender Application Control and the unwanted reboot

I came across this issue again this week on a customer site. Windows 10 computers were being rebooted without warning. 

You’re about to be signed out 

Windows will shut down in 10 minutes

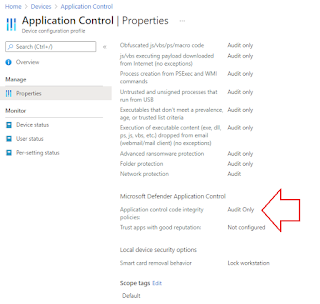
I narrowed this down to Microsoft Defender Application Control in Microsoft Endpoint Manager, "Application control code integrity policies" being set, even to Audit Only. 


This is created as a Windows 10 configuration profile, choosing the Endpoint Protection template, then selecting the Microsoft Defender Application Control.


If you use the tooltip and follow the "Learn more" link, you are directed to the Applocker CSP page, so clearly that's what is in use here. 

According to the Microsoft docs, prior to Windows 10 version 1709, Windows Defender Application Control was known as configurable code integrity (CCI). Interestingly, this is the only AppLocker setting that causes a reboot. It's well documented on the Applocker CSP page. 

"The AppLocker CSP will schedule a reboot when a policy is applied or a deletion occurs using the AppLocker/ApplicationLaunchRestrictions/Grouping/CodeIntegrity/Policy URI".

I can verify that the reboot occurs when you apply the policy but also when you remove it.

Some of my colleagues have suggested ways to avoid the reboot. 
  • Peter van der Woude talks about creating a custom code integrity policy using OMA-URI and the Application Control CSP.
  • Rudy Ooms talks about the WDAC wizard.
  • You can read about creating a new base policy in the official docs using the WDAC wizard. 
This reboot is not a problem when you configure the same setting with ConfigMgr.


In ConfigMgr, the WDAC wizard allows us to de-select the check box to enforce the required reboot.

I hope this helps.

Until next time.......

Software updates issue - access denied

We encountered this problem recently on a customer site. The customer uses ConfigMgr to patch their Windows 10 estate. They've not had any major issues for quite some time but then the January CU for Windows 10 v1909 (KB5009545) started to fail with the Access is denied error (0x80070005).


We could see the error in the UpdatesHandler.log file.

WSUS update (92c58401-7a51-4e9d-9457-ca1a93c3e3d9) installation result = 0x80070005, Reboot State = NoReboot

Update execution failed.

But what did that mean? Nothing had changed so why all of a sudden was access denied? What specifically was being denied access?

We found the answer in the CBS.log file. CBS refers to Component-Based Servicing. Some components might be installed or uninstalled during Windows updates, and CBS.log is a file that includes details of these components. This file logs detailed information from your most recent Windows installed updates, and thus it can be used for troubleshooting issues related to your updates.

This log file is located in %windir%\Logs\CBS\ folder. There were several errors like this repeating over and over

2022-02-08 19:32:05, Info                  DPX    DpxMoveFileExW failed, source: \\?\C:\Windows\SoftwareDistribution\Download\55d2d88ec6c8540e1de4d959136d1809\inst\_Windows10.0-KB5009545-x64.cab_\$dpx$.tmp\4f76f8be37b84846a53e298df591e679.tmp, destination: \\?\C:\Windows\SoftwareDistribution\Download\55d2d88ec6c8540e1de4d959136d1809\inst\_Windows10.0-KB5009545-x64.cab_\amd64_microsoft-windows-e..-unifiedwritefilter_31bf3856ad364e35_10.0.18362.449_none_f216a3681960d832\r\uwfservicingscr.scr, hr 0x80070005

We could see similar issues using Procmon

8:51:31.2419935 PM  TiWorker.exe  10516  SetRenameInformationFile C:\Windows\SoftwareDistribution\Download\7998dad7da209654d66a9b53acb8a555\inst\_Windows10.0-KB5010345-x64.cab_\$dpx$.tmp\8bdd9ac34e21374c8fe95160faa8a43e.tmp        ACCESS DENIED            ReplaceIfExists: True, FileName: C:\Windows\SoftwareDistribution\Download\7998dad7da209654d66a9b53acb8a555\inst\_Windows10.0-KB5010345-x64.cab_\x86_microsoft-windows-photoscreensaver_31bf3856ad364e35_10.0.18362.1316_none_1d493b2302fc0b6b\r\photoscreensaver.scr

This error referred to TiWorker.exe which is the TrustedInstaller process and suggested that it did not have Full Control or Full Access to all the folders or sub-folders within the directory named SoftwareDistribution (C:\Windows\SoftwareDistribution). This didn't make much sense as nothing had changed in the environment.

We noticed that all the files that were blocked had a .SCR extension. These were screensaver files that were being updated by the January CU. Then we discovered that there was a McAfee access protection rule in place to block access to .SCR files. 


The fix was then straightforward. We excluded the TiWorker.exe process from the Block all SCR rule and the updates started to install.

I hope this helps if you find yourself in a similar situation. CBS logs and Procmon are your friends 😀

Until next time........


Sunday, 28 November 2021

Convert CMG to virtual machine scale set

Starting in Configuration Manager version 2010, organizations with a Cloud Solution Provider (CSP) subscription could deploy the CMG with a virtual machine scale set (VMSS) in Azure. Starting in version 2107, all organizations can deploy a CMG with a virtual machine scale set. There is no longer a dependency on the subscription type. However, my favourite feature of Configuration Manager 2107 is that, if you have an existing CMG deployed with the classic cloud service, you can convert the CMG to use a virtual machine scale set. I did that conversion in my lab and it worked a treat.

Of course there are some rules:

  • You can change some settings when you convert to VMSS, for example size of VM, CRL check.
  • You cannot change other settings when you convert to VMSS, for example, Azure subscription, Azure AD app, Region, Resource group.
  • The CMG service name will change from cloudapp.net to yourregion.cloudapp.azure.com. You will have to re-configure the CNAME record.
  • If you don't change the CMG public name then you don't have to re-install the CMG Connection Point.

In the Configuration Manager console, navigate to the Administration workspace > Cloud Services, and select the Cloud Management Gateway node.


Select the classic CMG instance whose Status must be Ready. In the ribbon (or right click), select Convert. This action opens the Convert CMG wizard.


On the General page, select Next. As we said earlier, you can't change any of these settings.


On the Settings page, note the new Deployment name with the suffix for the virtual machine scale set (in my case that is GerryHCMG.westeurope.cloudapp.azure.com).

Make other configuration changes as needed. Then select Next and complete the wizard.


Click Next to finish the wizard and convert the CMG.


Monitor the conversion process in the CloudMgr.log file, the same way as a new deployment.

You will see the new Azure resources. See the Virtual Machine Set and Key Vault, for example. We didn't have these with the classic CMG implementation.

I hope this helps. Until next time....

Sunday, 17 October 2021

My first look at Windows 11 readiness

I'm a little bit late to the party here but I've been very busy this year. Some of my customers have started asking about Windows 11 so I've started looking into Windows 11 readiness. There has been some controversy about this already. Organizations are finding that many of the devices that easily run Windows 10 are not capable of running Windows 11. 

Windows 11 requirements.

Let's start with the hardware requirements. They are clearly defined in the Microsoft documentation. 

  • Processor: 1 gigahertz (GHz) or faster with two or more cores on a compatible 64-bit processor or system on a chip (SoC).
  • RAM: 4 gigabytes (GB) or greater.
  • Storage: 64 GB or greater available storage is required to install Windows 11.
    • Additional storage space might be required to download updates and enable specific features.
  • Graphics card: Compatible with DirectX 12 or later, with a WDDM 2.0 driver.
  • System firmware: UEFI, Secure Boot capable.
  • TPM: Trusted Platform Module (TPM) version 2.0.
  • Display: High definition (720p) display, 9" or greater monitor, 8 bits per color channel.
In general all these requirements seem pretty reasonable. The TPM requirement seems to be the one that has caused the most fuss. Many organizations still have a lot of hardware with TPM 1.2. Fortunately the firmware of many models can be upgraded to give you TPM 2.0, but your mileage may vary on that. Updating firmware on thousands of devices can be an administrative challenge, but we should be doing that anyway, shouldn't we 😀.

Michael Niehaus has published a blog post, Windows 11 new hardware requirements: Justified or not?, which delves into each requirement in detail. It's worth a read.

Windows 10 upgrade

If you want an in-pace upgrade from Windows 10 to Windows 11, you must be running a supported version of Windows 10. Currently that is v1909 or later. You can find the supported versions here

Windows 11 readiness.

This is the part that really interested me. How can organizations verify if their devices are Windows 11 capable or not? I've looked at a few options.

Script

Microsoft have published a script to determine whether an individual device meets the system requirements for Windows 11. Download HardwareReadiness.ps1 and run with an elevated prompt. 


The script output will be a returnCode (is the device capable or not)..... 

.
..and returnReason (why the device is not capable).

It is recommended to use Microsoft Endpoint Manager or Configuration Manager to deploy the script at scale.

Configuration Manager report

The guys at System Center Dudes have developed a pretty cool Windows 11 readiness report for Configuration Manager. You can download the report for free from their website

The report lists the following components and highlights in red if a component does not match the Microsoft minimum requirement: Device Name, UserName, Client Status, Client Version, OS Edition, OS Version, OS Branch, CPU Speed, RAM, Free Space, Device Manufacturer, Device Model, Secure Boot Status, UEFI Bios status, TPM version and status

Endpoint Analytics

I've been interested in this feature for some time now and it is really useful for assessing Windows 11 readiness. Windows 11 insights are available for all Intune-managed and co-managed devices in Endpoint analytics, as well as devices enrolled via tenant attach with Configuration Manager, version 2107 or newer.

In the MEM console, navigate to Reports > Endpoint Analytics.


Select
Work from anywhere (preview) and click WindowsA chart is displayed showing which specific hardware requirements are the top blockers in your organization.

In the Windows tab, a device-by-device view of Windows 11 hardware readiness is displayed. 


The 
Windows 11 readiness status column indicates if device is Capable of upgrading to Windows 11 based on the minimum system requirements. 


We see a Windows 11 readiness reason if it is 
Not capable.


In most cases, devices with a Windows 11 readiness status of Unknown are inactive. You can verify this by reviewing the last check in time from Intune. I've seen a lot of Unknown devices so I'll be doing some troubleshooting on these and will update this post with my findings.

I hope this helps. Until next time.....


Thursday, 17 June 2021

Migrating to a Microsoft Defender solution

This is becoming very popular and many of my customers have recently made the switch. It seems like a no-brainer, especially if you have purchased Microsoft 365 E5 licenses. 

This information should help you to plan and implement a migration from another endpoint protection solution.

Is Microsoft Defender Antivirus free?

It is, kind of. Microsoft Defender Antivirus is a core component of Windows 10. It's built into the operating system and is included in the cost of Windows. This is often good enough for a home user but certainly not for an enterprise organization. Defender AV needs to be managed and you must license the management tools. Microsoft Endpoint Manager (SCCM or Intune) are the favourites here.

What is Defender for Endpoint?

I've found that this is the most confusing part for customers. Defender for Endpoint (DfE), formerly Defender Advanced Thread Protection (ATP) is not Defender Antivirus. It's an enterprise endpoint security platform designed to help enterprise networks prevent, detect, investigate, and respond to advanced threats. Data from Defender antivirus can be consumed and used by DfE by onboarding devices independently to the service. You can currently access DfE (until 6th July 2021) using the Microsoft Defender Security Center 

https://securitycenter.windows.com/ (see next question).

What is Microsoft 365 Defender?

This is an integrated solution including the following:

  • Microsoft Defender for Endpoint
  • Microsoft Defender for Office 365
  • Microsoft Defender for Identity
  • Microsoft Cloud App Security

You can access the M365 Defender portal at https://security.microsoft.com/

The Microsoft Defender Security Center standalone portal will no longer be available from 6th July 2021. 

What license do I need for Defender for Endpoint for my workstations/laptops?

Microsoft Defender for Endpoint requires one of the following Microsoft volume licensing offers:

  • Windows 10 Enterprise E5
  • Windows 10 Education A5
  • Microsoft 365 E5 (M365 E5) which includes Windows 10 Enterprise E5
  • Microsoft 365 A5 (M365 A5)
  • Microsoft 365 E5 Security
  • Microsoft 365 A5 Security
  • Microsoft Defender for Endpoint (this is a standalone offering where you don't have any of the above subscriptions)
These are user based. Eligible licensed users may use Microsoft Defender for Endpoint on up to five concurrent devices. 

I have Microsoft 365 E5 licenses for all my users. Does this cover servers?

No, in this case you will need Microsoft Defender for Endpoint for Server (one per covered server). This is also covered with "Azure Security Center with Azure Defender enabled".

Can I just purchase Microsoft Defender for Endpoint for Server only?

No. Customers may acquire server licenses (one per covered server Operating System Environment (OSE)) for Microsoft Defender for Endpoint for Servers if they have a combined minimum of 50 licenses for one or more of the following user licenses:

  • Microsoft Defender for Endpoint
  • Windows E5/A5
  • Microsoft 365 E5/A5
  • Microsoft 365 E5/A5 Security
What else should I consider when migrating to a Microsoft Defender solution?

It's possible that this migration is not as simple as just switching to a new antivirus solution. There are a number of considerations.
  • Will you also be using Defender for Endpoint? This is recommended.
  • How will you manage Defender antivirus settings? It is recommended to use SCCM or Intune antimalware policies.
  • Note that Intune does not manage servers so you need to consider that.
  • Is your current solution providing more than antivirus functionality, which you must replace before decommissioning? Windows Firewall configuration is common, for example.
Can Microsoft Defender Antivirus and non-Microsoft antivirus/antimalware solutions co-exist?

Microsoft Defender Antivirus is automatically enabled and installed on endpoints and devices that are running Windows 10. But what happens when another (non-Microsoft) antivirus/antimalware solution is used? It depends on whether you're using Microsoft Defender for Endpoint together with your antivirus protection. 
  • In active mode, Microsoft Defender Antivirus is used as the antivirus app on the machine. Management products will apply. Files are scanned and threats remediated, and detection information are reported in your configuration tool.
  • In passive mode, Microsoft Defender Antivirus is not used as the antivirus app, and threats are not remediated by Microsoft Defender Antivirus. Files are scanned and reports are provided for threat detections that are shared with the Microsoft Defender for Endpoint service. 
  • When EDR in block mode is turned on (in Microsoft Defender for Endpoint) and Microsoft Defender Antivirus is not the primary antivirus solution, it will detect and remediate malicious items. EDR in block mode requires Microsoft Defender Antivirus to be enabled in either active mode or passive mode.
  • When disabled, Microsoft Defender Antivirus is not used as the antivirus app. Files are not scanned and threats are not remediated. Disabling/uninstalling Microsoft Defender Antivirus is not recommended in general; if possible, keep Microsoft Defender Antivirus in passive mode if you are using a non-Microsoft antimalware/antivirus solution.
  • If you are enrolled in Microsoft Defender for Endpoint and you are using a third-party antimalware product, then passive mode is enabled. The service requires common information sharing from Microsoft Defender Antivirus service in order to properly monitor your devices and network for intrusion attempts and attacks. 
  • When Microsoft Defender Antivirus is in passive mode, you can still manage updates for Microsoft Defender Antivirus; however, you can't move Microsoft Defender Antivirus into active mode if your devices have an up-to-date, non-Microsoft antivirus product that is providing real-time protection from malware. 
  • When Microsoft Defender Antivirus is disabled automatically, it can be re-enabled automatically if the protection offered by a non-Microsoft antivirus product expires or otherwise stops providing real-time protection from viruses, malware, or other threats. 
The following table summarizes what happens with Microsoft Defender Antivirus when non-Microsoft antivirus/antimalware solutions are used together, with or without Microsoft Defender for Endpoint.


Notes:

1. On Windows Server, version 1803 or newer, or Windows Server 2019, Microsoft Defender Antivirus does not enter passive mode automatically when you install a non-Microsoft antivirus product. you can set Microsoft Defender Antivirus to passive mode by setting the following registry key

Path: HKLM\SOFTWARE\Policies\Microsoft\Windows Advanced Threat Protection
Name: ForceDefenderPassiveMode
Type: REG_DWORD
Value: 1

2. Passive mode is not supported on Windows Server 2016. If you are using a non-Microsoft antivirus product, you cannot run Microsoft Defender Antivirus in either passive mode or active mode. In such cases, disable/uninstall Microsoft Defender Antivirus manually.

How can Defender antivirus be configured and managed?

Microsoft Endpoint Manager (SCCM or Intune) is my tool of choice for managing these settings. Let's have a look at SCCM first.
  • The Endpoint Protection Point is a site system role that must be added.
  • Afterwards, we can see Endpoint Protection status under Monitoring > Security.
  • Create antimalware policies and deploy to device collections. This includes items like scheduled scans, scan settings, real-time protection and antivirus exclusions.
  • Use Automatic Deployment Rules (ADR) to download and install updated Defender antivirus definition files, now called "security intelligence updates".
You can also use Intune to manage the Defender antivirus settings on workstations.
  • You can find the antivirus policies under Manage in the Endpoint security node of the Microsoft Endpoint Manager admin center.
  • Antivirus policies include the same settings as endpoint protection or device restriction profiles for device configuration policy and are similar to settings from device compliance policy. However, those policy types include additional categories of settings that are unrelated to Antivirus. The additional settings can complicate the task of configuring antivirus.
  • Policies contain the same type of settings that we can configure using SCCM.
  • Policies are assigned to device groups.
How do I onboard devices to Defender for Endpoint?

Onboarding a client to Microsoft Defender for Endpoint will enable Endpoint Detection and Response, Threat and Vulnerability Management and many other SecOps related functionalities. Once onboarded, the endpoint will appear in the Microsoft 365 Defender portal and advanced security events and insights will become available.

There is a straightforward Microsoft Defender for Endpoint onboarding experience, for any client supported by Microsoft Endpoint Manager, whether it is SCCM, Intune, or co-managed.

For SCCM, we will need an onboarding XML file. This is generated in the M365 Defender portal.
  • Navigate to Settings > Endpoints > Device management > Onboarding.
  • Choose your operating system and deployment method and generate a download package.
  • In SCCM, navigate to Asset and Compliance > Endpoint Protection > Microsoft Defender ATP Policies and create a new policy. 
  • Choose an Onboarding policy and navigate to the configuration file.
  • Deploy to a collection of devices.
The configuration is more integrated for Intune. The first step you take is to set up the service-to-service connection between Intune and Microsoft Defender for Endpoint. 
  • Set up requires administrative access to both the Microsoft Defender Security Center, and to Intune.
  • In the MEM portal, select Endpoint security > Microsoft Defender for Endpoint, and then select Open the Microsoft Defender Security Center.
  • In Microsoft Defender Security Center, select Settings > Advanced features.
  • For Microsoft Intune connection, choose On
  • Return to Microsoft Defender for Endpoint in the Microsoft Endpoint Manager admin center
  • Under MDM Compliance Policy Settings, set Connect Windows devices to Microsoft Defender for Endpoint to On
  • When this configurations are On, applicable devices that you currently manage with Intune, and devices you enroll in the future, are connected to Microsoft Defender for Endpoint for compliance.
  • Finally create an Endpoint Detection and response profile. In the MEM portal, select Endpoint security > Endpoint detection and response.
  • Create a policy as shown.
  • Assign to a group.
What is Microsoft Defender Security Center app?

This is the UI on the client and can be accessed by clicking on the Defender shield icon on the system tray. 


The layout can be customized by using an Endpoint Protection configuration profile in Intune. See where I've blocked the Family Options section.


This is the Microsoft Defender Security Center app without Family Options.

Where does OneDrive fit into all this?

It's a good idea to configure OneDrive in advance for your users by using a GPO. 


If you don't you will end up with this warning when Defender is enabled and active. OneDrive is required for file recovery in case of a ransomware attack. The user can continue to set up OneDrive or Dismiss the warning but that's not the best approach.

What advanced features should be configured?

Microsoft Defender has a wide range of options available for configuration using MEM (SCCM or Intune). You should consider configuring all of the following:
Can I customize the Defender Security Center app for my organization?

Yes, you can. You can add details of your organization and support to the Defender Security Center app to assist your end users. Using an Intune Endpoint Protection configuration profile, navigate to the Microsoft Defender Security Center section. 


You can enter the organization name and support telephone number, email address and website URL. I've just entered the organization name and website URL here.


This is what it looks like in the Defender Security Center app. You can see a new button on the bottom right.


Click on the button and you'll see the details you have configured.


This configures the registry as shown:
Computer\HKEY_LOCAL_MACHINE\SOFTWARE\Policies\Microsoft\Windows Defender Security Center\Enterprise Customization

What are the high-level steps for a migration?

Microsoft provides good guidance to switch from non-Microsoft endpoint protection to Microsoft Defender for Endpoint.


The high-level steps are as follows (this example uses McAfee): 
  • Prepare phase
    • Get and deploy updates across your organization's devices
    • Get Defender for Endpoint.
    • Grant access to the Microsoft Defender Security Center.
    • Configure device proxy and internet connectivity settings.
  • Setup phase 
    • Reinstall or enable Microsoft Defender Antivirus on your endpoints.
    • Configure Defender for Endpoint.
    • Add Microsoft Defender for Endpoint to the exclusion list for McAfee.
    • Add McAfee to the exclusion list for Microsoft Defender Antivirus.
    • Set up your device groups, device collections, and organizational units.
    • Configure antimalware policies and real-time protection.
  • Phase 3 
    • Onboard devices to Microsoft Defender for Endpoint.
    • Run a detection test.
    • Confirm that Microsoft Defender Antivirus is in passive mode.
    • Get updates for Microsoft Defender Antivirus.
    • Uninstall McAfee.
    • Make sure Defender for Endpoint is working correctly.
How do I test Defender functionality?

In the Defender Security Center app we can see at a glance that our policies have been applied.


Also, Microsoft provide assistance to allow us to test demo scenarios. They provide sample files which are harmless and for demonstration purpose only.


You can test cloud-delivered protection.


Network protection


Controlled Folder access


URL reputation


I hope this helps. Until next time.......


Tuesday, 20 October 2020

Managing Windows Virtual Desktops with Microsoft Endpoint Manager

Unsurprisingly, I have spent a lot of time recently deploying WVD solutions. In this blog post I want to highlight the MEM features that you can use to manage these desktops, especially in regard to Windows 10 multi-session. At the time of writing Configuration Manager 2006 in the latest production version.

For performance reasons ConfigMgr disables user policies on Windows 10 multi-session devices. This only happens with new client installations (1906 and later). If you upgraded the client from a previous version (pre 1906) then user policies will still be enabled. There may, of course, be a situation where you want to enable user policies and will accept any performance hit.


Open the Client Policy tab of Client Settings and choose "Enable user policy for multiple user sessions"


In versions 2006 and later, Windows 10 multi-session is now available in the list of supported versions for requirement rules. This is very useful when targeting FSLogix installations and registry settings.

If you previously selected the top-level Windows 10 platform, this action automatically selected all child platforms. The new platform isn't automatically selected. If you want to add Windows 10 multi-session, manually select it in the list.

Notes:
  • Currently Intune does not support Windows 10 multi-session but development work is actively being carried out.
  • Co-management is not supported on a client running Windows 10 multi-session.

These are exciting new MEM features with more to come. I hope this helps.

Until next time.......

Tuesday, 18 August 2020

CMG and VPN split tunnelling

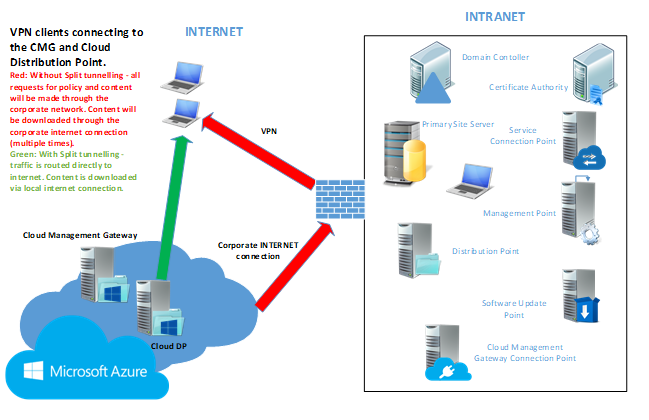
Let's first consider some CMG scenarios. First and foremost we deploy a CMG to manage internet-based clients. However, when the CMG is in place it can also be used to alleviate traffic on the VPN, subject to configuration of VPN split tunnelling. It is important to note the distinction between internet-based clients and those using the VPN. They are both remote clients but ConfigMgr handles them differently. Clients using the VPN will be deemed to be on the Intranet because they can communicate with a domain controller and a management point. Otherwise they are deemed to be on the Internet. 

Scenario 1: 


No additional boundary/boundary group configuration - CMG can manage devices truly on the internet that are not connected via VPN. Policy and content requests will be directly to internet with no chance of using corporate network.


Scenario 2: 


Configure boundary group for VPN subnets and associate with CMG for policy and content - VPN devices will connect to CMG for policy and Cloud distribution point for content. These requests will be made through the corporate network unless the traffic is routed directly to internet. Split tunnelling configuration is required to implement.


So what do we need to add to the split tunnelling configuration? It's very straightforward if your VPN configuration supports URLs. You need entries for the CMG and the storage account. The URLs are easy to find.


You'll find the service name in the properties of the CMG in the ConfigMgr console. You can see that the example from my lab is https://gerryhcmg.emslab.ie


What about the storage account? You'll find that in the Azure portal. See the example from my lab https://gerryhcmg.blob.core.windows.net/


You can also see this information in the log files on a ConfigMgr client. I have a test client installing software over CMG.


You can see the CMG URL in the CAS.log file.


Have a look in the DataTransferService.log file for the URL of the storage account. You'll see a line like:


Modifying download source from https://gerryhcmg.emslab.ie:443/downloadrestservice.svc/getcontentxmlsecure?pid=GH100009&cid=CONTENT_4E6083C7-411E-4CAD-AF2C-2633F6A4DCAA.1&tid=GUID:6B6A5684-4D64-44D8-ACD7-1CB28AB77307&iss=MEM.HAMPSON.LOCAL&alg=1.2.840.113549.1.1.11&st=2020-08-18T08:32:19&et=2020-08-18T16:32:19 to https://gerryhcmg.blob.core.windows.net/content-gh100009/Content_4e6083c7-411e-4cad-af2c-2633f6a4dcaa.1 (pre download)


What do you do if your VPN does not support split tunnel configuration via URL? It will be necessary to use IP addresses and ranges

The IP address of the CMG will not be known until it is deployed.


Then you'll find it in the Azure portal. It's 52.174.178.234 in my lab.

The IP ranges for Azure storage are published by Microsoft in a json file. However, it can be challenging to extract the information needed for your region. A Microsoft PFE (Ken Wygant) has published a community script to extract this information.


https://pfe.tips/get-azure-ip-ranges-your-cloud-management-gateway/


It gives you a list of IP ranges like this (this example is for EastUS2 region).


Then you can configure your split tunnel.


Thanks to Bryan Dam and Sandy Zeng for helping me to figure this out on the MVP distribution list.


I hope this helps. Until next time.....


Sunday, 5 July 2020

CMG and multiple root certificates

I was deploying a Cloud Management Gateway on a customer site recently and encountered this problem. This was a PKI deployment so I was adding internal root and intermediate certificates in the Settings page of the CMG wizard. 


I tried to satisfy the customer requirements but I was unable to add a third root certificate and received this error:

"You can only add two trusted root CAs and four intermediate CAs". 

I found that this was a limitation with CMG in ConfigMgr version 1902. This limit has been removed from version 1906 and later. 

The solution was obvious - upgrade the site to a later version.

I hope this helps. Until next time...…... 

Sunday, 21 June 2020

Cloud Management Gateway and Azure tags


I encountered this problem recently while deploying a CMG for a customer. Perhaps there was a better way for me to solve it but I'll explain the problem and how I worked around it. 

I got this error when creating the CMG. On my first try I was creating the resource group in the wizard.


Error occurred when granting Contributor permission to the Azure AD app for resource group xxxxx. For more information, see SmsAdminUI.log".

The error wasn't clear to me. I knew that I was using a Global Administrator account, which was also an Owner of the Azure subscription.  I didn't really understand the problem until I looked at the logs.

In the Azure activity log I found this.


It told me that the resource I was creating was disallowed by an Azure policy that had been configured. The policy was called "Require a tag and it's value on resource" and meant that resources could not be created in the subscription without tags and their associated values. I found the same text in the SmsAdminUI.log file. That makes sense. It's good for housekeeping, right?

However, ConfigMgr couldn’t create the resource group as there was a policy in place enforcing Azure tags, which I couldn’t configure in the wizard. I figured that I should create the resource group manually and apply tags to it. However I got the exact same error when I re-ran the wizard.

I finally solved it and created the CMG by disabling the policy. Perhaps there was a more graceful way to solve it but it allowed me to continue.

Remember, in ConfigMgr, logs are your friend.

I hope this helps.

Until next time...........