Tuesday, 17 November 2020

Autopilot White Glove issue

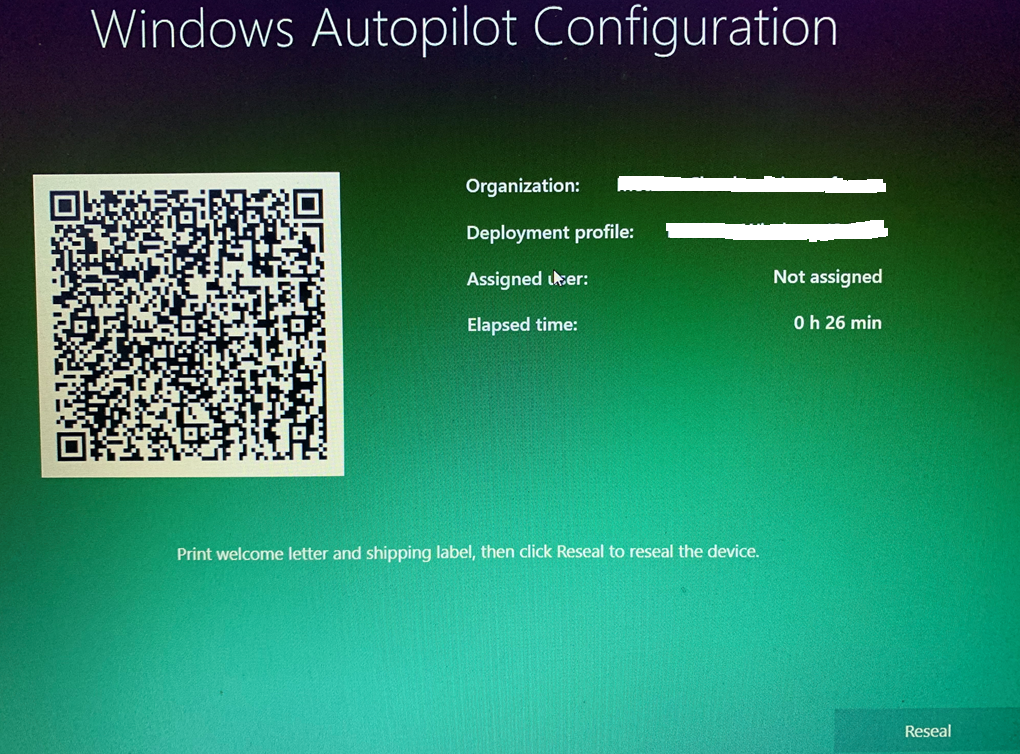
Windows Autopilot white glove feature has been renamed to Windows Autopilot for pre-provisioned deployment. The pre-provisioning service allows partners or IT staff to pre-provision a fully configured and business-ready Windows 10 PC. From the end user’s perspective, the Windows Autopilot user-driven experience is unchanged, but getting their device to a fully provisioned state is faster.

I recently encountered a problem with the process while deploying Windows 10 v1909. 


This UAC prompt for User OOBE Create Elevated Object Server appeared just after the Device setup phase. 


Clicking No caused a real problem and the process started again, this time getting stuck for hours trying to join the organization. This was never going to work. I could see in the MEM console that the device had joined Azure AD and enrolled in Intune and the apps had successfully installed.


Clicking Yes allowed the process to successfully finish.


The prompt is caused by a setting in the security baseline - Local Policies Security Options > Administrator elevation prompt behaviour. It was configured by default to Prompt for consent on the secure desktop. Changing that to Prompt for consent on non-Windows binaries did the trick and removed the prompt.

Thanks to my former colleague Dan Padgett for figuring that out.

Until next time.....


Sunday, 8 November 2020

Tip for capturing custom Windows 10 multi-session image for WVD

Azure gives us a nifty feature for capturing images from virtual machines. The high-level process is as follows:
  • Create the VM with Windows 10 multi-session
  • Install apps and customize
  • Snapshot the VM for future use
  • Sysprep and generalize the image
  • Capture the image
  • The image is then available in the gallery for creating WVD host pools

You'll find the capture feature in the Overview of the VM. Note that the capture renders the VM unusable and you can check a box to automatically delete the VM. If you want to revert you will have to create a new VM and apply the snapshot.

That all sounds great so what is the problem? The problem is actually a well known issue with capturing custom Windows 10 images. If you allow the reference computer (often a Hyper-V VM) to connect to the internet then the device can connect to the Windows 10 Store and update the built-in apps. This can cause Sysprep to fail. 


The easy way around that is to remove the NIC from the VM so that this cannot happen. 

However what can we do in Azure? You can't remove the NIC as you wouldn't be able to access the VM in that case. 


This is the Sysprep error I was seeing on my Azure reference computer. 

SYSPRP Failed to remove staged package Microsoft.PPIProjection_10.0.18362.449_neutral_neutral_cw5n1h2txyewy: 0x80070002.[gle=0x00000002]

I needed to prevent internet access but still maintain network access. DNS to the rescue. Normally a VM inherits DNS settings from the virtual network. However you can configure a custom DNS server for any VM. If you configure a DNS server that doesn't exist then the VM will not be able to access the internet but you still retain network access.

Click on the network interface for the VM.
 

You'll find that in the Networking blade.


Configure the dummy DNS server. Remember you have to be quick. Do this as soon as the VM is created. This worked for me and I was able to successfully syprep and capture the image. 

I hope this helps. Until next time........

Saturday, 24 October 2020

Windows 10 modern management with Intune - BitLocker issues

Implementing a Windows 10 modern management solution with Intune is not as challenging as it has been in the past. Microsoft have improved the admin experience and the feature set, but more importantly, the platform is now very reliable and stable. Howeever we can still encounter issues from time and time. More than likely they are caused by mis-understanding or mis-configuration. I encountered some of these issues relating to BitLocker this week and I wanted to share.

1. Creating the policy

There are a number of ways to configure and enforce BitLocker in the Microsoft Endpoint Manager (MEM) admin center. The most recent way to manage device security is to use endpoint security policies in the Endpoint security node. This allows you to configure your policies simply without having to navigate the huge number of settings in device configuration profiles or security baselines.


Configuring the policy is very straightforward. There are four categories to configure. I only wanted to encrypt the OS drive so I figured that that I'd just have to configure the Base Setttings and OS Drive Settings categories.


Base Settings


OS Drive Settings

However I couldn't save the policy. 


I got the error "Encryption method setting for all drive types must have an encryption type, or all drive types must not be configured". This didn't make sense to me but I now understand that it is in fact documented. You'll find this information in the BitLocker CSP documentation.

"When you enable EncryptionMethodByDriveType, you must specify values for all three drives (operating system, fixed data, and removable data), otherwise it will fail (500 return status). For example, if you only set the encrytion method for the OS and removable drives, you will get a 500 return status".

Configuring encryption (with the same settings) on the fixed and removable drives solved the problem and I could save the policy. If you don't want to do this then you need to configure BitLocker in another location in the admin center, for now. This feature is still a work in progress.

2. Remove the ISO/DVD

This is a well known issue but it's very annoying so I want to highlight it here. It happens mostly when using VMs for testing. The Windows 10 ISO can still be mounted on the VM and this causes BitLocker to fail. 


"Failed to enable Silent Encryption. TPM is not available.


Error: BitLocker Drive Encryption detected bootable media (CD or DVD) in the computer. Remove the media and restart the computer before configuring BitLocker".


This issue is well documented. During the provisioning process, BitLocker Drive Encryption records the configuration of the device to establish a baseline. If the device configuration changes later (for example, if you remove the media), BitLocker recovery mode automatically starts. To avoid this situation, the provisioning process stops if it detects removable bootable media.

Remove the bootable media, and restart the device.


3. Security baseline conflict

I hadn't really wanted to configure an encryption method for removable drives but I was forced to do do because of issue #1 above. 


I configured the settings like this (not blocking write access to an unprotected removable drive).


That led to this error describing a conflict.

"Failed to enable Silent Encryption


Error: BitLocker Encryption cannot be applied to this drive because of conflicting Group Policy settings. When write access to drives not protected by BitLocker is denied, the use of a USB startup key cannot be required. Please have your system administrator resolve these policy conflicts before attempting to enable BitLocker".


I eventually found that this was due to a setting in the Windows 10 security baseline. The default setting was to block write access to an unprotected removable drive. Changing that setting did the trick and the OS drive was encrypted successfully.

I hope these tips help. Until next time....

Tuesday, 20 October 2020

Managing Windows Virtual Desktops with Microsoft Endpoint Manager

Unsurprisingly, I have spent a lot of time recently deploying WVD solutions. In this blog post I want to highlight the MEM features that you can use to manage these desktops, especially in regard to Windows 10 multi-session. At the time of writing Configuration Manager 2006 in the latest production version.

For performance reasons ConfigMgr disables user policies on Windows 10 multi-session devices. This only happens with new client installations (1906 and later). If you upgraded the client from a previous version (pre 1906) then user policies will still be enabled. There may, of course, be a situation where you want to enable user policies and will accept any performance hit.


Open the Client Policy tab of Client Settings and choose "Enable user policy for multiple user sessions"


In versions 2006 and later, Windows 10 multi-session is now available in the list of supported versions for requirement rules. This is very useful when targeting FSLogix installations and registry settings.

If you previously selected the top-level Windows 10 platform, this action automatically selected all child platforms. The new platform isn't automatically selected. If you want to add Windows 10 multi-session, manually select it in the list.

Notes:
  • Currently Intune does not support Windows 10 multi-session but development work is actively being carried out.
  • Co-management is not supported on a client running Windows 10 multi-session.

These are exciting new MEM features with more to come. I hope this helps.

Until next time.......


Sunday, 27 September 2020

iOS VPP App installation errors with Intune

I recently conducted an Intune pilot where Intune was integrated with Apple Business Manager. This allowed us to synchronize apps purchased through the Apple Volume Purchase Program (VPP). VPP simplifies the process of purchasing and deploying iOS apps.


Apps were synchronized and appeared in the Intune portal where they could assigned to groups of users.


However there were errors when the apps were installed on the test devices. There were two specific errors:

Can't find VPP license for app (0x87D13B95)

VPP App licensing pending user consent. Ensure the user has accepted the VPP management invite. (0x87D13B92)

Both errors referred to app licensing so I was pretty sure that the problem was with how the apps were assigned in Intune.

The apps were configured for device licensing in Apple Business Manager. VPP Device Assignment grants app licenses directly to a device, identifying it by serial number. This makes VPP Device Assignment the best option to use when you do not want to associate your apps to end user's Apple ID. The apps install completely silently with VPP Device Assignment.


However the apps were assigned with User licensing in Intune. 

Apps that were assigned as "Required" were straightforward to fix.


We just had to edit the assignment and choose Device licensing


Apps that were assigned as "Available" were not as straightforward.


The licensing options were greyed out. 

In this case you must remove the assignment and start again. 


This time edit the assignment before saving it and you can choose Device licensing.


This solved both problems and the apps installed correctly.
 
Note that User licensing is the default setting and you have to change it to Device licensing. For Available apps you must change it when you create the assignment and before you save it. For Required apps you can edit the setting afterwards.

I hope this helps.

Until next time......