Now that all the prerequisites have been verified you can enrol a macOS device. First ensure that there are no restrictions preventing that.
Navigate to Devices > Enrol devices > Enrolment device platform restrictions. Verify that personally owned macOS is allowed.
There are a number of device enrollment scenarios for macOS.
- User-owned (BYOD) - allows users to download and install the Company Portal app for Mac. The device is enrolled when a licensed user signs into the app. This method can be used to enrol personal or corporate devices. Note that users have to download the Company Portal app for Mac installer directly. It is not available in the App Store. This is the method I have used for this blog series.
- Automated Device Enrollment (ADE) (supervised) - previously called Apple Device Enrollment Program (DEP), this option configures settings using Apple Business Manager (ABM) or Apple School Manager (ASM). It enrolls a large number of devices, without you ever touching the devices. These devices are purchased from Apple, have your preconfigured settings, and can be shipped directly to users.
- Direct enrollment - these devices are organization-owned, and set up using the Apple Configurator. The main purpose is to be a kiosk-style device. They aren't associated with a single or specific user.
Enrollment
First verify that the device is supported. At the time of writing, macOS 11.0 and later are supported.
My device has version 12.6.1 of macOS (Monterey). Note that this was upgraded from a previous version.
Launch a browser and browse to https://aka.ms/EnrollMyMac. The CompanyPortal-Installer.pkg file downloads automatically.
Double click to launch the installer.
Click Continue.
Click Continue.
You must accept the license terms. Click Agree.
Click Install.
macOS warns that new software is being installed. Enter your device admin password.
The Intune Company Portal for Mac is installed. Click Close.
Launch the Company Portal and click Sign in.
Enter your corporate credentials.
Enter your password and satisfy the MFA challenge if configured (highly recommended).
Click Begin.
Read about what the organization can see and click Continue.
As with all Apple devices we need to install a management profile. It is now two steps - download and install. Click Download profile.
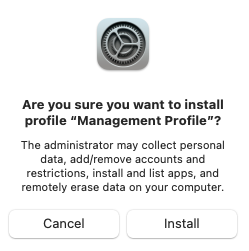
Click Install.
Click Install again.
Enter the device admin password to allow enrollment in MDM. We'll discuss the significance of this next.
The management profile has been installed and the device is managed by the organization. It's a little unusual to see that the device is supervised. You have greater management control over a device when it is supervised. However, in general for Apple devices, this requires that Automated Device Enrollment is used to enrol in MDM, using programs such as Apple Business Manager. There is one exception to this. A Mac device can be supervised if it was upgraded to macOS 11 or later and the enrolment in MDM was approved by a local administrator account. That's the scenario I have. You can read more about that here.
The device has been enrolled. Click Done.
The device can be seen in Entra ID. Note that the OS is macMDM (not macOS).
(device.deviceOSType -eq "macMDM") can be used for a dynamic device group query for Mac devices.
The dynamic group is available for use.


No comments:
Post a Comment